


Hi everyone,
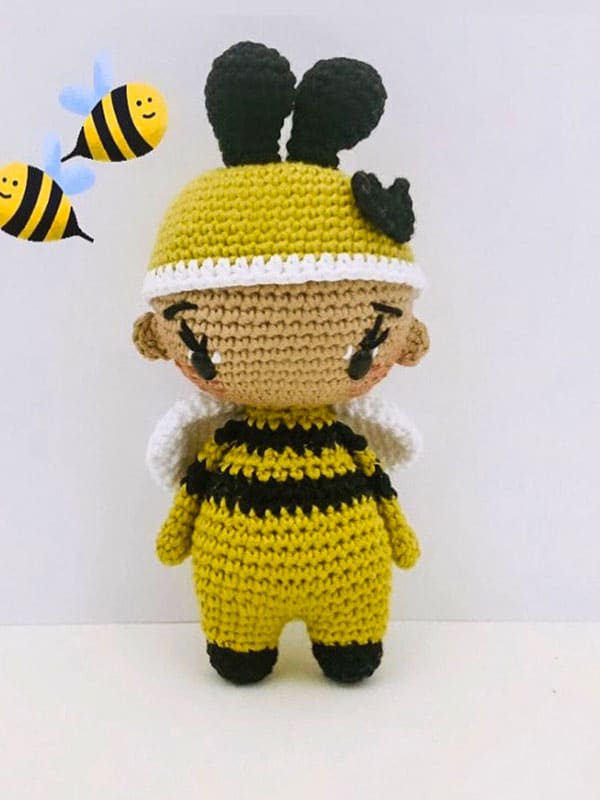
Bees are the cutest friends of spring. Today I shared with you the cute amigurumi bee pattern. It is very easy to make the free pattern step by step. Amigurumi will be the cutest toy of animal patterns. When the free amigurumi pattern is completed, it will be 16cm. It will be a great gift idea for next Christmas. You can make different accessories to decorate the amigurumi bee pattern. You can knit an amigurumi bee pattern in different colors and use it to decorate your home. Thanks to the creator of the bee mai amigurumi pattern.
The little bee mai amigurumi pattern is very easy to do. We knit the legs and the part of the body together. Yellow, black and tan thread are used. You can change the thread color if you want. We knit the wings, arms and antennae separately. We will sew it to the body part after completing the parts. You can make eyes out of plastic accessories. Visit the lovelycraft page to see different amigurumi patterns. After completing the amigurumi bee pattern, you can put makeup on your cheeks. Don’t forget to add the Amigurumi mai bee pattern to your favorites list.
PDF Crochet Little Bee Mai Amigurumi Free Pattern
Designer
Instagram: cherrycrochett
MATERIALS
• Yarn / wool: choose the colors that suit you the most like (yellow, white, pink …)
• Hook / crochet hook 3.00 mm.
• Safety eyes.
• White filling (fiber type, cotton …)
• Needle for sewing, scissors and marker.
Basic level
SIZE: 16 cm
Abbreviations
st(s) – stitch(es)
sc – single crochet
dec– decrease
inc– increase
slst– Slip Stitch
dc – double crochet
() x… times – number of times we have to repeat the instructions.
HT– crochet only in the back strand
C.C. – color change in the last sc of the round.
• Crochet as tightly as possible and in a spiral, so that the stitches are together and the filling is not visible.
• With this pattern, you can make a large or small bee, depending on the thickness of the yarn / yarn you use.
• As a recommendation, I advise you to move “inc and dec” to avoid marks when crochet
Let’s start knitting the amigurumi bee pattern 🙂
We knit the legs and the part of the body of the amigurumi bee pattern together.
Legs (Make 2)
We start with black
Rnd 1. Magic ring 6 sts and adjust (6)
Rnd 2. inc x 6 (12)
Rnd 3-4. 1 sc in each sts (2 rnd) (12)
Color change- Yellow
Rnd 5. HT – 1 sc in each sts (12)
Rnd 6. (3 sc, 1 inc) x 6 (15)
Rnd 7. 1 sc in each sts (15)
We join the legs
Rnd 8. 15 sc – 15 sc (30)
Rnd 9. 1 sc in each sts (30)
Rnd 10. (4 sc, 1 inc) x 6 (36)
Rnd 11-15. 1 sc in each sts (5 rnd) (36)
Rnd 16. (4 sc, 1 dec) x 6 (30)
Color Change – Black
Rnd 17. 1 sc in each sts (30)
Rnd 18. (3 sc, 1 dec) x 6 (24)
Color change- Yellow
Rnd 19-20. 1 sc in each sts (2 rnd) (24)
Color change- Black
Rnd 21. 1 sc in each sts (24)
Rnd 22. (2 sc, 1 dec) x 6 (18)
Color change- Yellow
Rnd 23. 1 sc in each sts (18)
Rnd 24. (1 sc, 1 dec) x 6 (12)
Color change – Skin
We continue with the head
Hair Tie
4 chains. Close with slst on the 1th generating the magic ring. Weave in the center. Make 4c, 4 dc double, 4c and close with slst in the center. Repeat and wind strand in the center
After completing the legs of the amigurumi bee pattern, crochet the head part. 🙂
Head
Rnd 25. 1 sc in each sts (12)
Rnd 26. inc x 12 (24)
Rnd 27. (1 sc, 1 inc) x 12 (36)
Rnd 28. (5 sc, 1 inc) x 6 (42)
Rnd 29. (6 sc, 1 inc) x 6 (48)
Rnd 30. (7 sc, 1 inc) x 6 (54)
Rnd 31-40. 1 sc in each sts (10 rnd)* (54)
Rnd 32. (7 sc, 1 dec) x 6 (48)
Rnd 33. (6 sc, 1 dec) x 6 (42)
Rnd 34. (5 sc, 1 dec) x 6 (36)
Rnd 35. (4 sc, 1 dec) x 6 (30)
Rnd 36. (3 sc, 1 dec) x 6 (24)
Rnd 37. (2 sc, 1 dec) x 6 (18)
Rnd 38. (1 sc, 1 dec) x 6 (12)
Rnd 39. 6 dec and close (6)
Eyes: rows 32, 10 sts apart
We are going to knit the hat of the amigurumi toy. You can change the hat color as you wish. 🙂
Hat
(Yellow)
Rnd 1. Magic ring 6 sts and adjust (6)
Rnd 2. inc x 6 (12)
Rnd 3. (1 sc, 1 inc) x 6 (18)
Rnd 4. (1 inc, 2 sc) x 6 (24)
Rnd 5. (3 sc, 1 inc) x 6 (30)
Rnd 6. (4 sc, 1 inc) x 6 (36)
Rnd 7. (5 sc, 1 inc) x 6 (42)
Rnd 8. (6 sc, 1 inc) x 6 (48)
Rnd 9. (7 sc, 1 inc) x 6 (54)
Rnd 10-15. 1 sc in each sts (6 rnd) (54)
Color change- White
Rnd 16. 1 hdc in each sts (54)
We knit the wings and arms of the amigurumi bee pattern 🙂
Wings (Make 2)
Rnd 1. Magic ring 6 sts and adjust (6)
Rnd 2. inc x 6 (12)
Rnd 3. (1 sc, 1 inc) x 6 (18)
Rnd 4. 1 sc in each sts (18)
Rnd 5. (1 inc, 2 sc) x 6 (24)
Rnd 6-7. 1 sc in each sts (2 rnd) (24)
Rnd 8. (2 sc, 1 dec) x 6 (18)
Rnd 9. 1 sc in each sts (18)
Rnd 10. (1 sc, 1 dec) x 6 (12)
Rnd 11. 1 sc in each sts (12)
Rnd 12. 6 dec
Fold and close with sc
Arms
We start in yellow
Rnd 1. Magic ring 5 sts and adjust (5)
Rnd 2. 1 inc x 5 (10)
Rnd 3. 1 sc in each sts (10)
Rnd 4. (2 sc, 1 dec, 1 sc) x 2 (8)
Rnd 5-6. 1 sc in each sts (2 rnd) (8)
Color change- Black
Rnd 7-8. 1 sc in each sts (2 rnd) (8)
Color change- Yellow
Rnd 9. 1 dec, 6 sc (7)
Rnd 10. 1 sc in each sts (7)
Color change- Black
Rnd 11. 1 sc in each sts (7)
Fold and close with sc
We knit the ears and antennae of the amigurumi bee 🙂
Ears
4 chains (we start at 2*) 1 sc, 1dc, 1sc
We close with a dwarf stitch. Tab long strand to sew.
Antennas
(Black)
Rnd 1. Magic ring 6 sts and adjust (6)
Rnd 2. inc x 6 (12)
Rnd 3. (1 sc, 1 inc) x 6 (18)
Rnd 4-5. 1 sc in each sts (2 rnd) (18)
Rnd 6. (1 sc, 1 dec) x 6 (12)
Rnd 7. (2 sc, 1 dec) x 3 (9)
Rnd 8-10. 1 sc in each sts (3 rnd) (9)
Assembly
STEP 1. We start with the head. Place the safety eyes of the size you prefer, at the height of the round 32, leaving 10 points of separation between them. Sew the ears between rows 32 and 34 to 6 stitches the eyes.
STEP 2. Sew the arms to the body at the height of row 22.
STEP 3. Join the wings, place them in the center of the back and sew.
STEP 4. Put on the hat and sew the small antennas in the highest part. The creative moment has come! Let your imagination fly! Use a strand of thread to make eyelashes, eyebrows, freckles … personalize your little bee by placing its
antennas and loop in the place you like the most … remember that the small details are what mark the difference.
Congratulations, you have completed the Little Bee Mai amigurumi pattern. 🙂
