


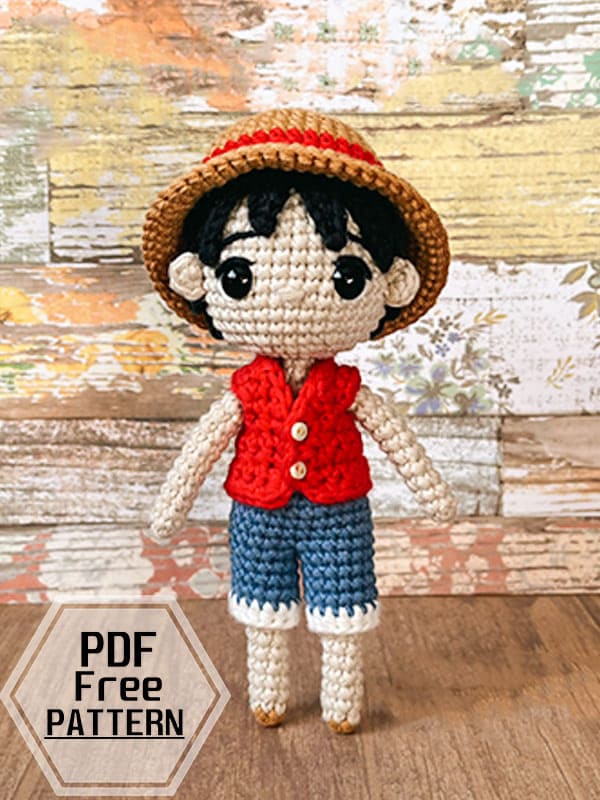
Hello everyone, my friends who love amigurumi, today I bring you the crochet pattern of the Luffy character, the main character of the anime and manga series one piece. First of all, I would like to thank the owner of the pattern for this cute crochet doll. Thanks to detailed step by step crochet doll pattern instructions, you will complete the cute anime character Luffy pattern without difficulty. A great original gift idea for your children or your anime-loving friends. Now I leave you with the free crochet Monkey D. Luffy pattern. Stay tuned for more free crochet amigurumi patterns.
One Piece Character Crochet Luffy PDF Amigurumi Free Pattern
Designer: nix.amigurumi
Abbreviations
Sc: single crochet.
Inc: increase of single crochet.
Dec: decrease of single crochet.
Hdc: half double crochet.
Hdc-dec: half double crochet decrease.
Dc: double crochet.
Slst: Slip stitch
BLO-Back loop only
FLO-Front loop only
Materials and tips
• Color yarn: beige for skin, blue, white, black, red and light brown.
• Two hooks. Crochet the legs, body, head and arms with a 0.25 smaller hook than the clothes and the hair.
• 9 mm security eyes.
• 2 small yellow buttons.
• Yarn needle and scissors.
• Optional: hot glue for the hair.
• Marker for counting the rows. Put the marker at the beggining of each row. You can buy one or use a piece of thread, a safety pin…
• Fiberfill stuffing.
Legs (Make 2)
Start with beige colour for skin. Crochet in spiral:
Rnd 1: 6 sc in magic ring (6).
Rnd 2: 5sc, 1 inc (7).
Rnd 3-7: 7 sc (7).
Rnd 8: 6sc, 1 inc (8).
Rnd 9-10: 8 sc (8).
Rnd 11: 7 sc, 1 inc (9).
Rnd 12-13: 9 sc (9).
Cut the thread and fasten off the first leg.
Do not cut the thread on the second leg and continue crocheting the join of the legs.
Join of the legs
Change to blue color:
Rnd 14: 2 sc, 3 ch, join to the first leg with 1 sc, 8sc on the first leg, 3 sc on the chains, 7 sc on the second leg (24).
Rnd 15: 24 sc
Rnd 16: 24 sc, make 5 sc additionals and move the marker. Continue counting rows from here.
Rnd 17: 4 sc, 1 dec, 10 sc, 1 dec, 6 sc (22).
Change to beige color:
Rnd 18: BLO, 1 dec, 3 sc, 1 dec, 4 sc, 1 dec, 3 sc, 1 dec, 4 sc (18).
Rnd 19-22: 18 sc (18).
Rnd 23: 3 sc, 1 dec, 8 sc, 1 dec, 3 sc (16).
Rnd 24: (2 sc, 1 dec) x4 (12).
Rnd 25: 6 dec (6).
Rnd 26-27: 6 sc (6).
Now we are going to crochet the trousers. We will continue crocheting the head later.
Trouser
Start with blue colour, crochet in spiral. We are going to crochet the pants on the front loops left on row 17. Feet facing up, insert the hook on the first FLO of row 17.
Rnd 1: 5 sc, 1 inc, 10 sc, 1 inc, 5 sc (24).
Rnd 2-4: 24 sc (24)
Now we are goint to crochet the right trouser leg.
Right trouser leg:
Rnd 5: 12 sc, chain 3.
Rnd 6: Join with 1 sc on the first stitch we made on row 1, 11 sc and 3 sc on the chains(15).
Rnd 7-8: 15 sc.
Rnd 9: 15 sc, make 2 sc additional and move the marker. Continue counting rows from here.
Change to white colour:
Rnd 6: 13 hdc, 1 hdc-dec. (14)
Left trouser leg:
Insert the hook on the next stitch of row 5 to crochet the left leg. Repeat the right trouser leg pattern.
Now we are going to crochet the head. Continue crocheting on row 28 of the body.
Head
Rnd 28: 6 inc (12).
Rnd 29: 12 inc (24).
Rnd 30: (3 sc, 1 inc) x6 (30).
Rnd 31: 2 sc, 1 inc, (2 sc, 1 inc) x5, 2 sc (36).
Rnd 32-40: 36 sc (36).
Place the security eyes between rows 35-36.
Rnd 41: 2 sc, 1 dec, (4 sc, 1 dec) x5, 2 sc (30).
Rnd 42: (3 sc, 1 dec) x6 (24).
Rnd 43: 1 sc, 1 dec (2 sc, 1 dec) x5, 1 sc (18).
Rnd 44: (1 sc, 1 dec) x6 (12).
Rnd 45: 6 dec (6).
Arms (Make 2)
Start with beige colour, crochet in spiral:
Rnd 1: 6 sc in magic ring (6).
Rnd 2-10: 6 sc (6).
Rnd 11: 3 slst, 3 hdc.
Ears (Make 2)
Rnd 1: 5 sc in magic ring
Pull until you get a D shape. Cut the thread and leave long a thread to sew..
Vest
Use a 0.25 – 0.5 bigger hook or crochet more loosely. At the end of each row chain 1 and turn the labor. Start with red colour:
Rnd 1: chain 16, start on the second chain counting from the hook, (1 sc, 1 inc) x7, 1 sc (22).
Rnd 2: 2 sc, chain 3, skip 5 stitches, 8 sc, chain 3, skip 5 sc, 2 sc. (18)
Rnd 3-5: 18 sc (18)
Rnd 6: 4 sc, 1 aum, 8 pb, 1 aum, 4 pb. (20)
Cut the yarn. Now we are goint to make a row all around the vest.
Insert the hook on the side. Start by making one of the sides with 6 sc, one for each row.
Now we are going to make the neck area: skip the first stitch, 12 sc and skip the last stitch.
Continue on the next side doing 2 sc, 2 chains, skip 1 stitch, 1 sc, 2 chains, skip 1 stitch and 1 sc.
Now we are going to make the bottom edge, start with 1 inc, 18 sc, 1 inc.
Fasten off.
Hair
Start with black colour, crochet in spiral. Use a 0.25 – 0.5 bigger hook and crochet more loosely:
Rnd 1: 6 sc in magic ring (6)
Rnd 2: 6 inc (12).
Now we will make the strands:
Strand 1: chain 12, start on the second chain counting from the hook, 1 slst, 1 sc, 2 hdc, 4 dc, 2 hdc, 1 sc and join with a slst to the first stich of row 2 (11).
Strands 2-7: chain 14, start on the second chain counting from the hook, 1 slst, 1 sc, 2 hdc, 6 hd, 2 hdc, 1 sc and join with a slst to the next of row 2 (13).
Strand 8: chain 12, start on the second chain counting from the hook, 1 slst, 1 sc, 2 hdc, 4 dc, 2 hdc, 1 sc and join with 1 slst to the first stich of row 2 . (11).
Strand 9: chain 8, start on the second chain counting from the hook, 1 slst, 1 sc, 4 hdc, 1 sc and join with a slst to the next of row 2 (7).
Strand 10: chain 6, start on the second chain counting from the hook, 1 slst, 1 sc, 2 hdc, 1 sc and join with a slst to the next of row 2 (5).
Strand 11: chain 7, start on the second chain counting from the hook, 1 slst, 1 sc, 3 hdc, 1 sc and join with a slst to the next of row 2 (6).
Strand 12: chain 8, start on the second chain counting from the hook, 1 slst, 1 sc, 4 hdc, 1 sc and join with a slst to the next of row 2 (7).
Hat
Start with light brown colour, crochet in spiral:
Rnd 1: 8 sc in magic ring (8)
Rnd 2: 8 inc (16).
Rnd 3: (1 sc, 1 inc) x8 (24).
Rnd 4: 1 sc, 1 inc, (2 sc, 1 inc) x7, 1 sc (32).
Rnd 5: 32 sc (32).
Rnd 6: (3 sc, 1 inc) x8 (40).
Rnd 7-9: 40 sc (40).
Change to red colour:
Rnd 10: 40 sc (40).
Rnd 11: 9 sc, 1 inc, 20 sc, 1 inc, 9 sc (42).
Change to light brown colour:
Rnd 12: FLO, 3 sc, 1 inc, (6 sc, 1 inc) x5, 3 sc (48).
Rnd 13: (7 sc, 1 inc) x6 (54).
Rnd 14: 4 sc, 1 inc, (8 sc, 1 inc) x6, 4 sc (60).
Rnd 15: 60 sc (60).
Fasten off.
Assembling
Sew the eyes details.
Sew the nose.
Sew the ears 3 stitches appart from the eyes. Sew them between rows 35-36.
Sew or glue the hair. Place strands 1 and 8 behind each ear.
Place strands 2-7 between them. Strands 9, 10, 11 and 12 are the bang.
Place his little hat on his head.
Congratulations! Your amigurumi character is ready.


What does “CAD” mean? I’m on joining the legs (teached myself to crochet about two weeks ago).
it’s ch. sory for that.