


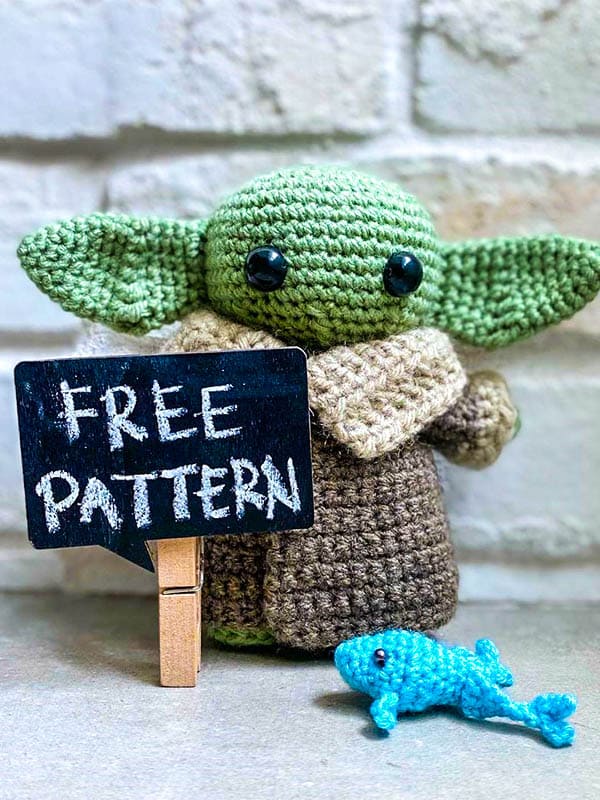
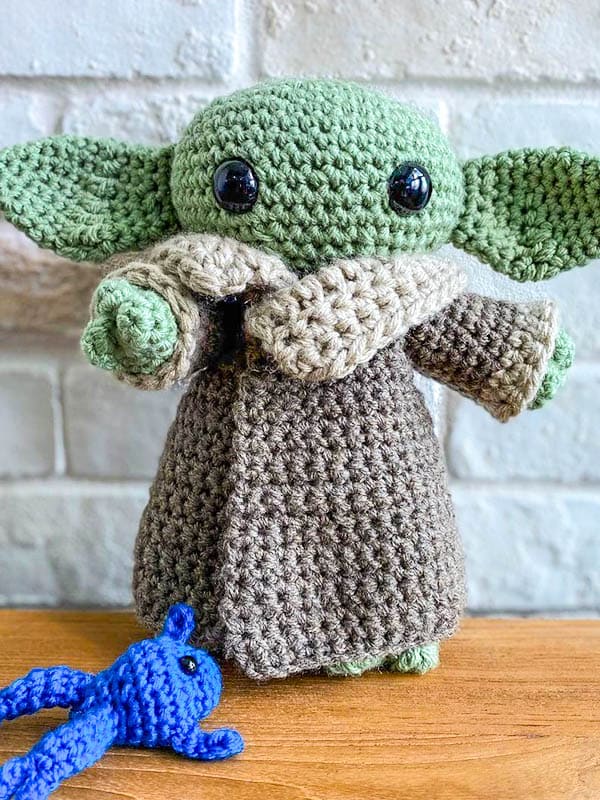
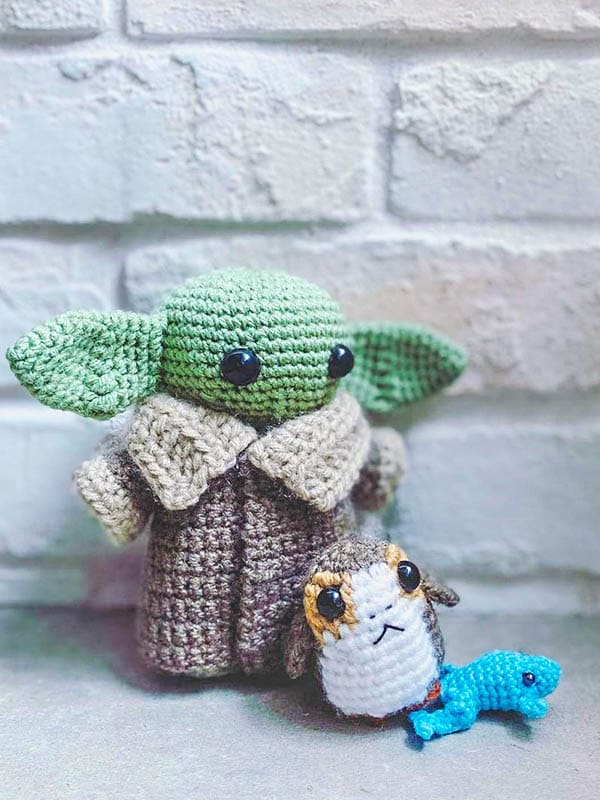
Dear friends, First of all, hello to all of you. Today we will try to crochet the amigurumi pattern of the yoda character we know from the star wars movie. I share this pattern with you completely free of charge. You can get two different versions of Baby Yoda amigurumi doll on raverly. However, it is a little different from the star wars movie. We will crochet baby yoda amigurumi.
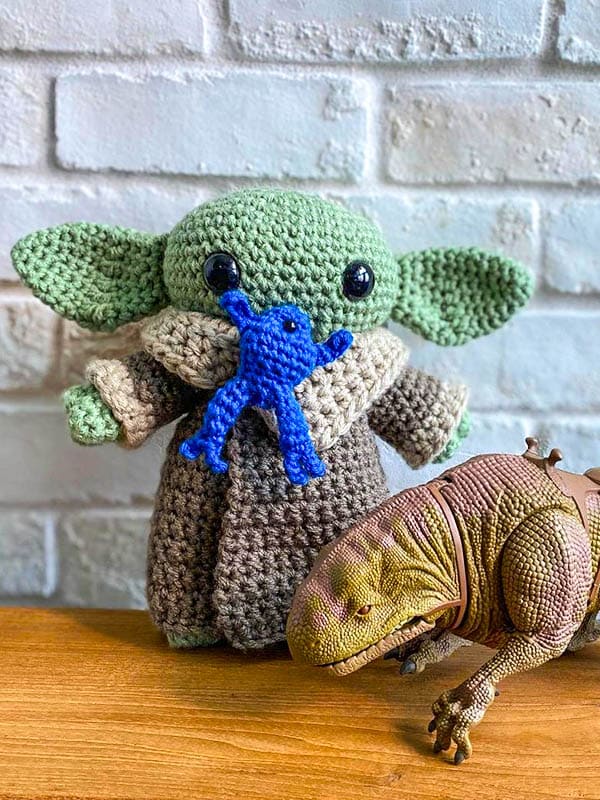
An imaginary star wars hero yoda (grogu) amigurumi toy pattern. A long brown coat and a wonderfully cute character. If your children are a star wars fan, it is the ideal toy for them. If you wish, you can present the yoda doll to your loved ones as a Christmas gift. Introducing the Jedi high general Grogu! As you may remember from the Star wars movie, the grogu amigurumi pattern is with you as a baby design and is completely free pattern. We would like to thank the designer friend for this wonderful pattern. Have fun.
Baby Yoda Amigurumi Crochet Free Pattern
Designer
Instagram: octoberin_thechair


SC – single crochet
DC – double crochet
HDC – half double crochet
TC – triple crochet
Dec – decrease
Inc – increase
I used 8ply yarn with 4mm hook for the body & brown coat. 12ply with 4mm hook for the beige part. 15mm plastic safety eyes but size up or down according to your yarn and hook size.
This pattern is worked in continuous rounds except for the coat, which is worked in rows. There’s no need to slip stitch to join or ch1 at the end of each round. Coat sleeves worked in continuous rounds.
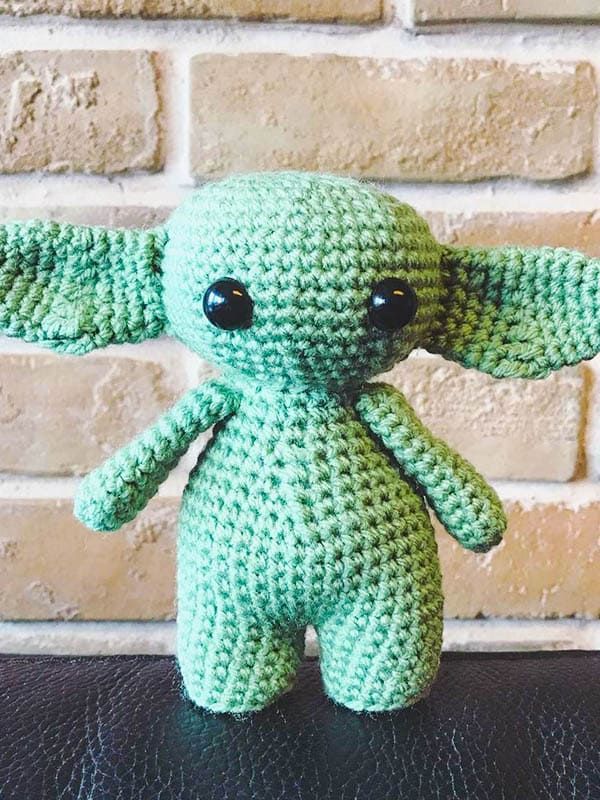
Head (use green)
1. Work 8 SC in a magic circle (8)
2. Inc in each SC x 8 (16)
3. (Inc, SC) x 8 (24)
4. (Inc, SC in next 2 SC) x 8 (32)
5. (Inc, SC in next 3 SC) x 8 (40)
6. (Inc, SC in next 4 SC) x 8 (48)
7. SC in each stitch for rounds 7-13 (48)
14. (Dec, SC in next 4) x 8 (40)
15. (Dec, SC in next 3) x 8 (32)
16. (Dec, SC in next 2) x 8 (24)
17. (Dec, SC) x 8 (16)
and fasten off. Leave a long tail to stitch onto the body
Do not stitch shut as we will stitch the head onto the body later.
*Insert safety eyes between rows 11 & 12, 9 SC apart.
After we will crochet to baby yoda amigurumi ears.
Ears (make 2 in green)
1. Work 4 SC in a magic circle (4)
2. (Inc, SC) x 2 (6)
3. (Inc, SC) x 3 (9)
4. SC all around (9)
5. (Inc, SC) x 4, Inc (14)
6. SC all around for rows 6 – 8 (14)
9. SC, HDC, HDC, DC, DC, TC, TC, TC, TC, DC, DC, HDC, HDC, SC (14)
10. SC all around (14)
11. SC all around (14)
12. (Dec, SC) x 4, SC, SC (10)
13. SC all around (10) and leave a long tail to stitch onto the head
I would suggest stuffing the head and stitching it on the body before you stitch on the ears. A fully stuffed head is easier to manage than a floppy one.
Stitch the top of the ears between rows 8 & 9 and the bottom of his ears between rows 13 & 14 with the pointy parts facing downwards.
If you’ve used 15mm eyes, the ears are located 6 stitches away from the edge of the eye. Adjust accordingly to the size of the eyes you’ve used.
Complated to the ears of baby yoda amigurumi doll. We will crochet to feet of baby yoda.
Feet (make 2 in green)
1. Work 6 SC in a magic circle (6)
2. Inc x 6 (12)
3. (Inc, SC in next 2) x 4 (16)
4. Back loops only, SC all around (16)
5. SC in each stitch for rounds 5-8 (16)
Cut and fasten off for first leg. Do not cut yarn for 2nd leg. Use this to continue row 9 together with 1st leg.
Be a little patient :). Now baby yoda body crochet!
Body
The next few stitches will merge the two feet to begin the body. Continue crocheting in the round.
9. Begin with 1st leg, SC in next 16 all around, continue onto 2nd leg, SC in next 16 all around (32)
10. (Inc, SC in next 7) x 4, SC (37)
11. SC all around for rounds 11 – 16 (37)
17. (Dec, SC in next 7) x 4 (32)
18. (Dec, SC in next 6) x 4 (28)
19. (Dec, SC in next 5) x 4 (24)
20. SC all around (24)
21. (Dec, SC in next 4) x 4, (20)
22. SC all around for rounds 22 – 23 (20)
24. (Dec, SC in next 3) x 4 (16) and fasten off
Stuff both head and body. Position the head neatly on the body (16 to 16 stitches) and use the long tail from the head to stitch onto the body.
We need two parts more. Baby yoda amigurumi’s arms and sleeves.
Arms (make 2 in green)
1. Work 5 SC in a magic circle (5)
2. Inc x 5 (10)
3. SC all around for rows 3 – 11 (10)
12. Hold flat and crochet together before stitching on body
Don’t have to stuff the arms unless you want a more puffy look. I didn’t stuff mine.
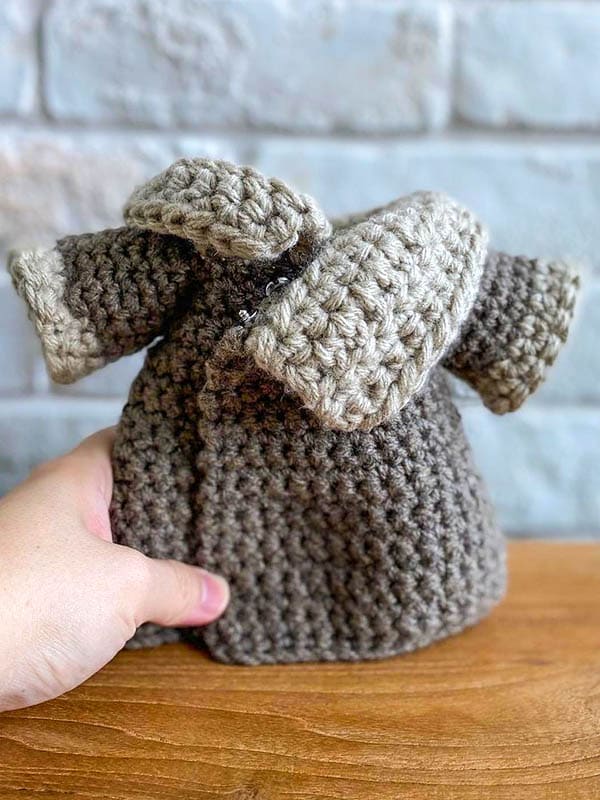
Coat (Ch1 and turn at the end of each row unless marked by *. Start with brown)
1. Ch48 (48)
2. SC on 2nd stitch and SC throughout (47)
3. SC x 47 for rows 3 – 8 (47)
9. (Dec, SC in next 6) x 5, (Dec, SC in next 5) (41)
10. SC all around for rows 10 – 15 (41)
16. (Dec, SC in next 7) x 4, (Dec, SC in next 3) (36)
17. SC all around for rows 17 – 18 (36)
19. SC in next 5, Ch 7, skip next 7 stitches, SC in next 9, Ch 7, skip next 7 stitches, SC in next 8 (36)
Change colour to beige
20. *Ch2 turn, HDC in next 8, SC in next 7, HDC in next 9, SC in next 7, HDC in next 5 (36)
21. HDC all around (36)
22. *Ch2, DC in next 7, HDC in next 8, SC in next 9, HDC in next 7, DC in next 5 (36)
23. HDC all around for rows 23 – 25 (36) and fasten off
Finally finished to arms of baby yoda.
Sleeves
1. SC directly on arm hole (16)
2. SC all around for Rows 2 – 6 (16)
Change colour to beige
7. SC all around (16)
8. HDC all around (16) and fasten off
You may want to sew a press-stud or button just under the collar to keep the coat shut.
If using the same pattern for this size, I’d suggest using a 4ply yarn.
Enjoy the free amigurumi pattern and tag the designer on Instagram @octoberin_thechair.
Baby Yoda Amigurumi is reardy!
Download PDF Pattern


What yarn did you use?
Hey! van u pls tell me how long is it? Thanks!!
Thank you for the Pattern! It was a lot of fun to do!
Im having issues with the decreasing in the body after you attach the legs & its driving me crazy. Is it something Im doing wrong or are the pattern counts off?
The pattern counts is off
Going from Round to 10 on the body is where it doesn’t make sense for me. There aren’t stitches, doing one increase and seven sc four times gives you 36 stitches. It says to SC at the end, but by then you’ve used the 32 stitches from the previous round so I don’t know where that stitch is supposed to go. Then when she starts decreasing again, she goes from 37 stitches to 32 with only four decreases, which leaves an extra stitch. I made it with 36 stitches. It looks cute, regardless and his body is hidden under the robe anyway. Hope this helps.
I’m very confused with the joining of the legs, there’s something missing and it’s very unclear to me. I’m not sure what stitch to start in when joining the legs, and do I use the same strand of yarn that was used in the end of the 2nd leg?
Would it be possible for you to add the pattern for the cute froggy that goes with? Thank you for this fantastic pattern!
What yarn did you use not sure about finding 8 ply ?
I’m a little confuse please help. On the 4 row for the head you said to incorporate in the next two sc x8 (32) please explain it to me