


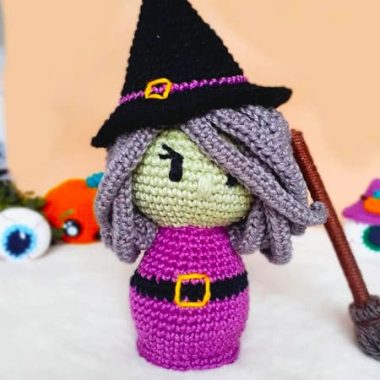
Hi everyone,
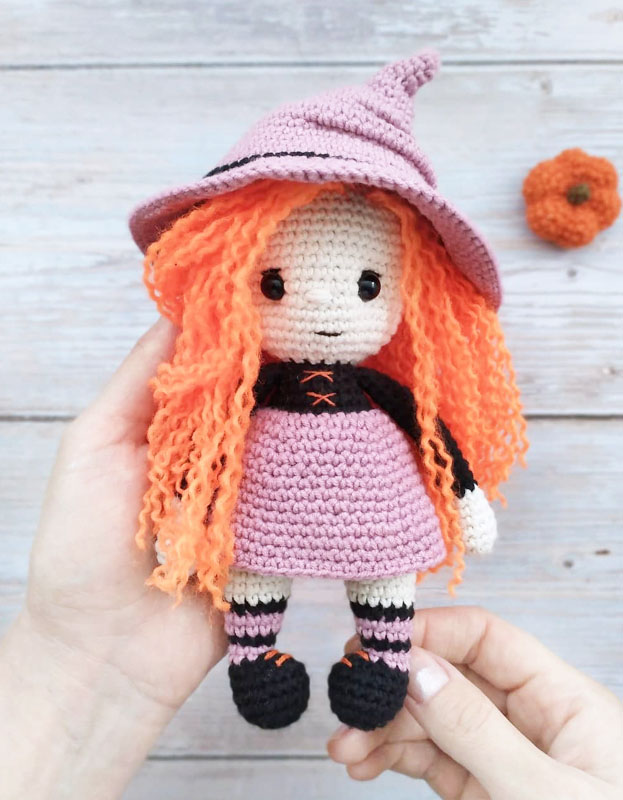
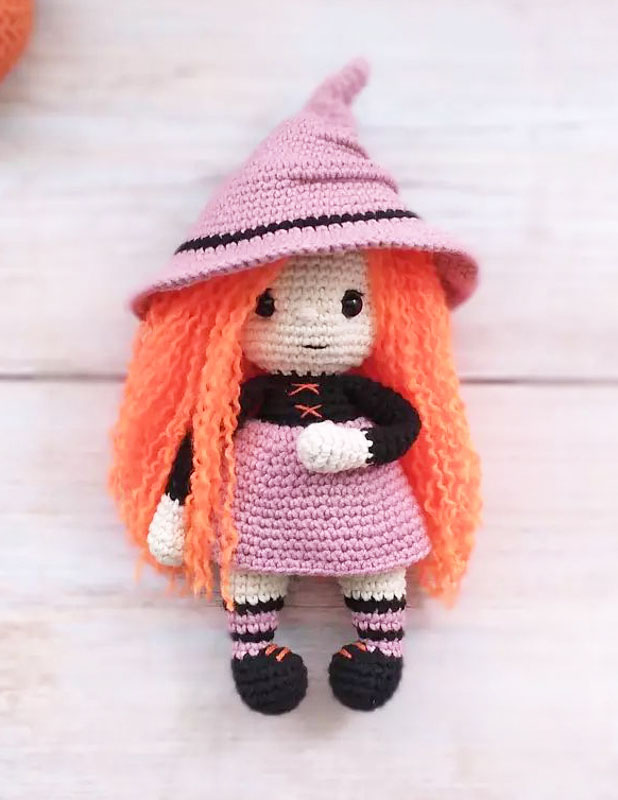
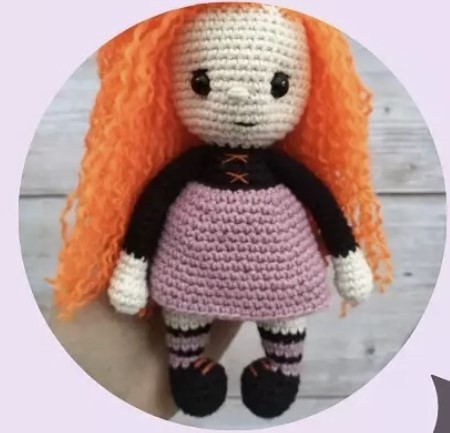
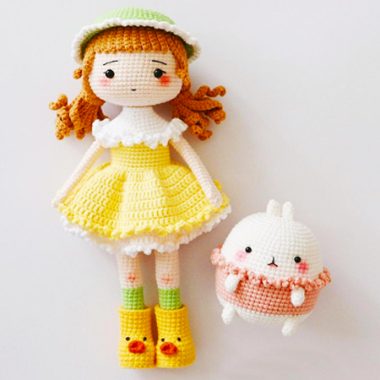
It’s almost Halloween. You can make the Abóbora witch amigurumi doll easy step by step for free. Thanks to the creator of the pattern. You can crochet amigurumi pattern for your children and loved ones. You can make patterns of colored pumpkins next to the Amigurumi doll in different colors. You can make a flying broom for an amigurumi pattern. You can make a magic stick that the amigurumi crochet doll will hold in her hand.
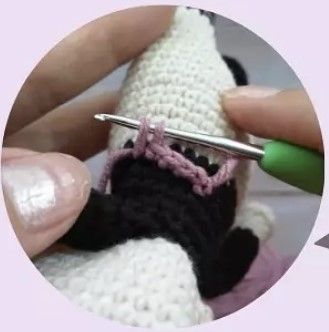
The Amigurumi Abóbora witch pattern is very easy to make. We knit the body and head together. We knit the arms of the amigurumi doll separately. Once done, let’s sew it to the body part. You can make the hair of the Amigurumi witch pattern using any colored yarn you want. You can make eyes out of plastic accessories. You can make it using black yarn if you want. The hat of the amigurumi witch pattern is crocheted with black yarn. Don’t forget to add the Abóbora Amigurumi witch pattern to your favorites list.
PDF Crochet Pumpkin Witch Halloween Amigurumi Pattern
Designer: uliyaross
Materials
• Cotton yarn
YarArt Jeans 50 g / 160 m (60 °/o cotton, 40% acrylic) black and beige, any additional color of your choice
• Yarn YarArt Baby 50 g / 150 m (acrylic) red hair color (or any other color of your choice)
• Strong yarn for sewing eyes and hair
• Eyes 6 – 8 mm
• Hook 2 mm
• Filler for toys
• Hair sewing needle
• Scissors
• Marker to indicate the beginning of the row
• Tailor’s pins
Abbrevations
Rnd : round
MR : magic ring
Ch : chain
sl st : slip stitch
sc : single crochet
inc : increase
dec : decrease
hdc : half double crochet
BLO : back loops
FLO : front loops
0* : repeat till the end of round
[ ] : total number of stitches in the round
The toy is crocheted in one piece starting from the legs, the handles are crocheted. Stuff in the course of crocheting
The size of the finished toy in the hat is 19 cm
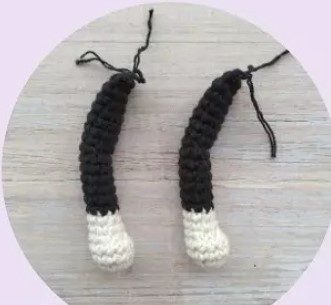
Arms
We start crocheting in beige color Stuff the base of the arm
1Rnd: 6 MR (6)
2Rnd: (inc)x 6(12)
ЗRnd-4Rnd: -12 sc (12)
5Rnd: 3 sc (3 dec slst), 3 sc (9)
6Rnd-7Rnd: 9 sc (9) change yarn color to black
8Rnd- 13Rnd: – 9 sc (9)
14Rnd: 4 sc, 4 slst, 1 sc (9)
15Rnd-20Rnd: – 6 rows 9 sc + 6 sc fold crocheting, crochet together 4 sc
Fasten the yarn, hide in crocheting
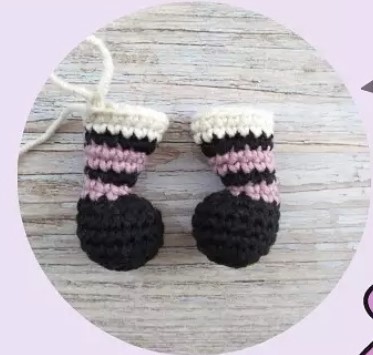
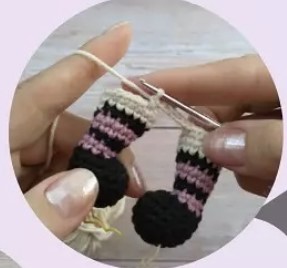
Legs
Stuff in the course of crocheting
We start crocheting in black
1Rnd: 6 MR
2Rnd: 6 inc (12)
3Rnd: (1 sc, inc) x 6 (18)
4Rnd- 6Rnd: – 3 rows 18 sc (18)
7Rnd: 4 sc, (dec) x 5, 4 sc (13) change yarn color to optional
8Rnd: 3sc, dec, dec from 3 loops slst, dec, 3 sc (9)
9Rnd: 9 sc
10Rnd: 3 sc, (inc) x 3, 3 sc (12) change yarn color
13Rnd: 5 sc, (inc) x 3, 4 sc (15) change yarn color to beige
14Rnd-15Rnd– 2 rows 15 sc (15)
Cut the yarn fasten
We crochet the second leg, do not cut the yarn
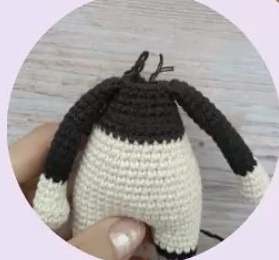
Let’s move on to crocheting the body
Body
For 1 leg, crochet 8 sc, 5 ch, attach to the second
legs 10 sc from the beginning of the row, so that the legs look at each other with toes. crochet on the 1st leg 15 sc, 5 sc in a chain of ch, on the 2nd leg 15 sc, 5 sc in a chain, put a marker, marking the beginning of the row. (40)
1 Rnd: 15 sc., 5 hdc, 15 sc, 5 hdc (40)
2Rnd: -8Rnd: – 7 rows 40 sc (40)
9Rnd: (6 sc, dec) x 5 (35)
10Rnd-11 Rnd: -35 sc (35)
12Rnd: (5 sc, dec) x 5 (30)
13Rnd: – 30 sc (30) change yarn color to black
14Rnd: 30 sc (30)
15Rnd: (4 sc, dec) x 5 (25)
16Rnd: 25 sc in BLO (25)
17Rnd: 25 sc
18Rnd: (3 sc, dec) x 5 (20)
19Rnd: we crochet arm 4 sc, 5 sc on the arm and body, 5 sc, 5 sc on the arm and body, 1 sc (20)
20Rnd: (2 sc, dec) x 5 (15) change yarn color to beige
21 Rnd: 15 sc
Do not cut the yarn
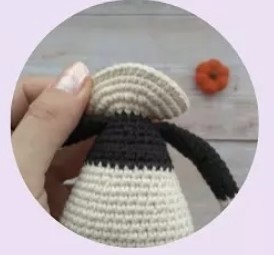
Let’s move on to crocheting the head
Head and hair
1 Rnd: 15 inc (30)
2Rnd: (1 sc, inc) x 15 (45)
3Rnd-14Rnd: – rows (45) Between 7R. and 8R. insert eyes at a distance 10 sc
15Rnd: (7 sc, dec) x 5 (40)
16Rnd: (6 sc, dec) x 5 (35)
17Rnd: (5 sc, dec) x 5 (30)
18Rnd: (4 sc, dec) x 5 (25)
19Rnd: (3 sc, dec) x 5 (20)
20Rnd: (2 sc, dec) x 5 (15)
21Rnd: (1 sc, dec) x 5 (10)
22Rnd: (dec) x 5 (5)
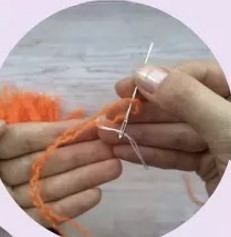
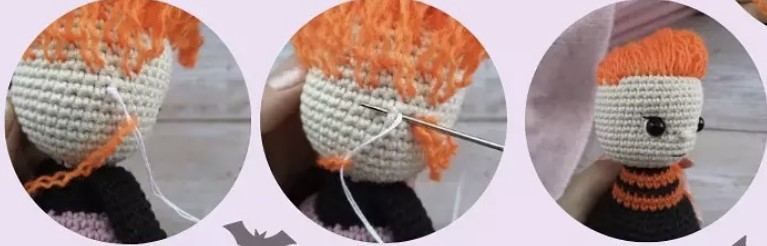
Pull the hole, hide the yarn in crocheting Sew in the hairs with a strong yarn Cut off strips of acrylic yarn 25 cm long and divide it into 3 separate yarns Mark the boundaries of hair growth with pins and sew to the head with a strong yarn
Between 6R. and 7R. embroider nose with jeans yarn
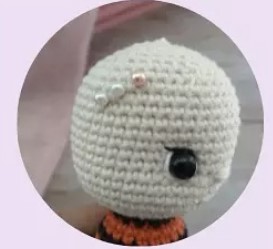
Embroider a mouth with a thin black yarn
Hair
Hair can be crocheted in the process of crocheting for this:
10Rnd: 44 and 45 loops we crochet hairs
11Rnd: in 2,5,8,11,14,17 loops we crochet hairs
total on the bottom row 7 hairs
12Rnd: crochet 45 sc without crocheting hairs
13Rnd: crochet a hair in 43 loop
14Rnd: in 1,4,7,10,13,16 19 loops crochet hairs
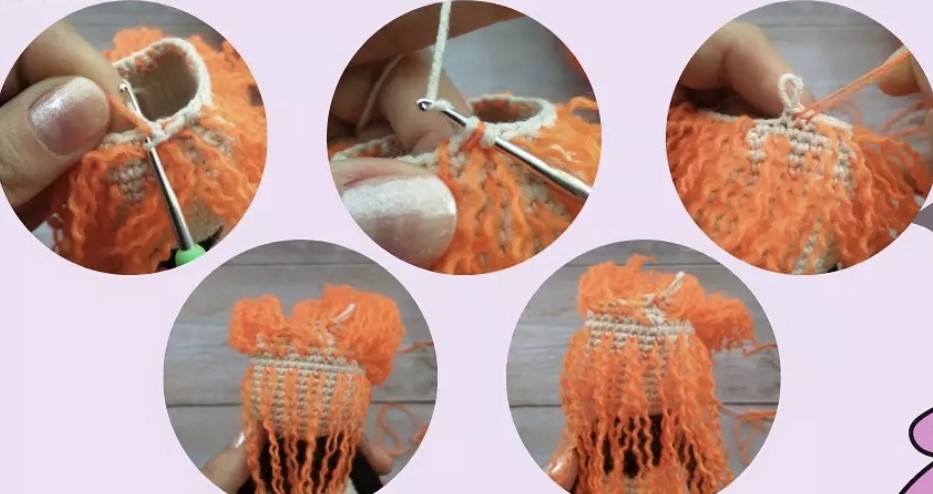
15Rnd: in 42, 45, loops crochet hairs
16Rnd: in 3,6,8, 11,14,16,19 then we crochet the hairs along the face into each loop to the end of the row
Next, we crochet the hairs in each row, into each loop until the end of crocheting, do not forget to make decreases according to the head crocheting pattern
Dress
We attach the yarn to the half loops in 16R. body
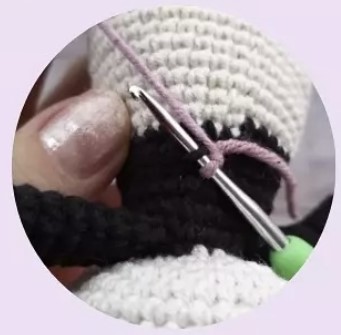
1Rnd: 25 sc (25)
2Rnd: (4 sc, inc) x 5 (30)
3Rnd: (5 sc, inc) x 5 (35)
4Rnd: 35 sc (35)
5Rnd: (6 sc, inc) x 5 (40)
6Rnd: 40 sc (40)
7Rnd: (7 sc, inc) x 5 (45)
8Rnd-10Rnd: 3 rows 45 sc
11 Rnd: (8 sc, inc) x 5 (50)
12Rnd: -14Rnd: 3 rows (50)
Cut the yarn fasten.
Hat
1Rnd: 6 MR
2Rnd: – 3Rnd: 6 sc (6)
4Rnd: (1 sc, inc) x 3 (9)
5Rnd: 3 sc, 4 sc ib BLO, 2 sc (9)
6Rnd: 7 sc, (inc) x 2 (11)
7Rnd: (inc) x 2, 9 sc (13)
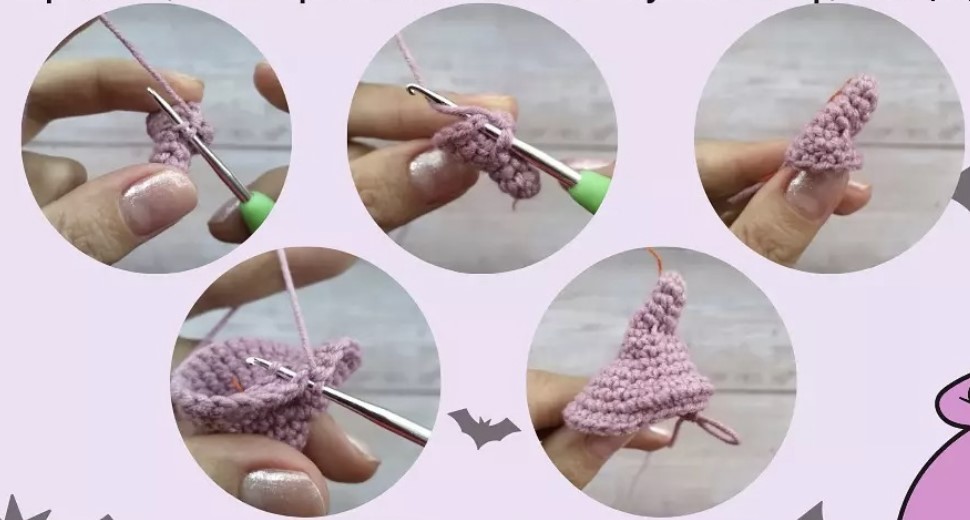
8Rnd: 5 sc, 4 sc crochet capturing half loops with 5, 4 sc (13)
9Rnd: 13 sc (13)
10Rnd: (inc) x 5, 8 sc (18)
11Rnd: (2 sc, inc) x 6 (24)
12Rnd: 24 sc
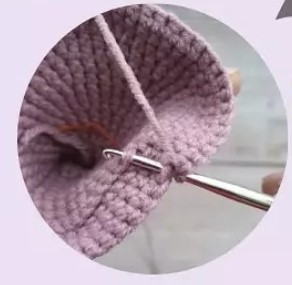
13Rnd: 12 sc, 10 sc for front loop, 2 sc (24)
14Rnd: (1 sc, inc) x 6, 12 sc (30)
15Rnd: 18 sc, 10 sc crochet together for half loops with 13, 2 sc (30)
16Rnd: 30 sc (30)
17Rnd: (4 sc, inc) x 6 (36)
18Rnd: 36 sc (36)
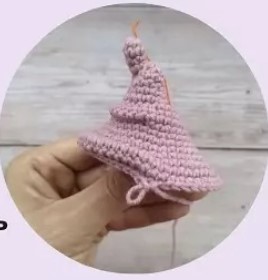
19Rnd: (2 sc, inc) x 12 (48)
20Rnd: 26 sc, 20 sc for front loop,2 sc (48)
21Rnd: (2 sc, inc) x 6, 30 sc (54)
22Rnd: 54 sc (54)
23Rnd: 32 sc, 20 sc crochet together for half loops in 20, 2 sc
24Rnd: 54 sc (54)
25Rnd: (8 sc, inc) x 6 (60)
26Rnd-27Rnd: 60 sc (60) change yarn color
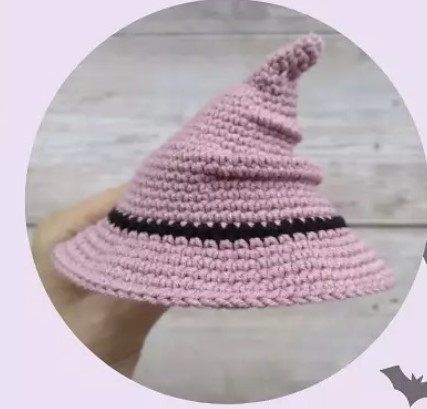
28Rnd: 60 hdc , change yarn color (60)
29Rnd: 60 sc (60)
ЗОRnd: (1 sc, inc) x 30 (90)
31Rnd- 34Rnd: – 4 rows (90) Cut the yarn fasten
Witch toy is ready!
Download PDF Pattern

