


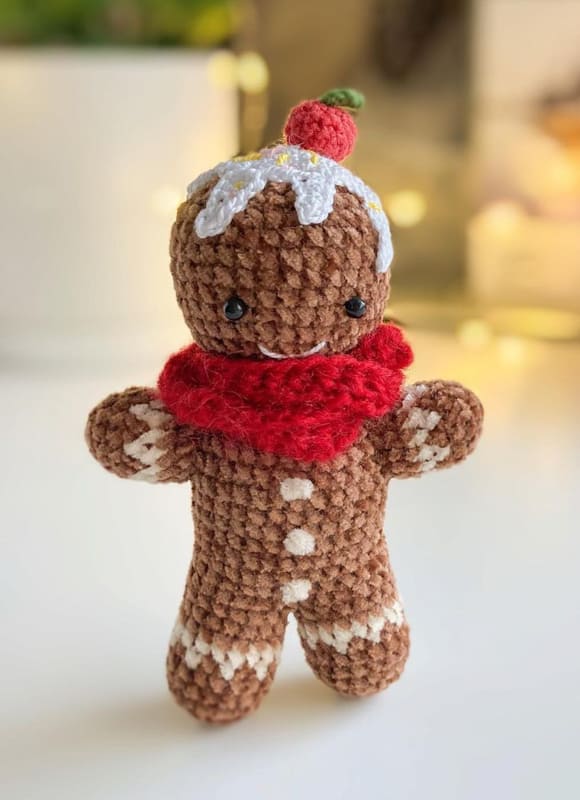
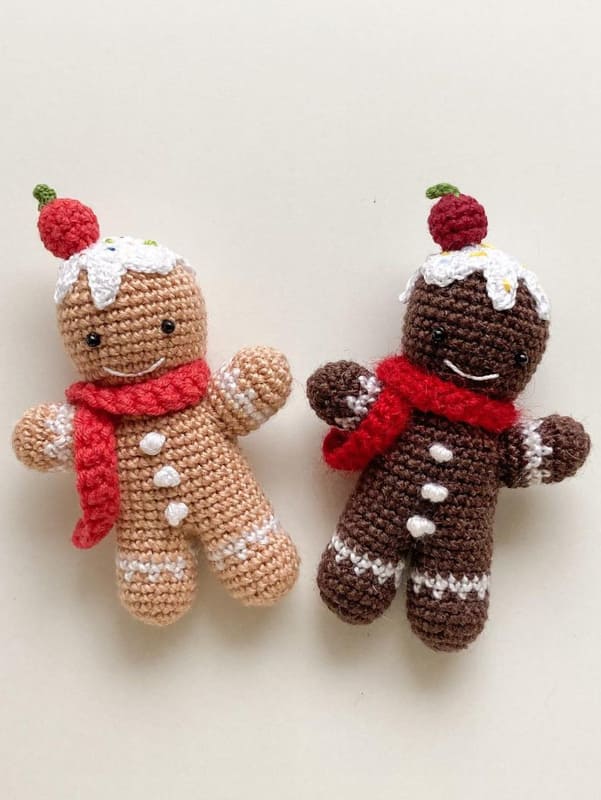
Hello dear friends. Today we will crochet a brand new and very cute amigurumi pattern with you. Our crochet pattern for today is gingerbread. A truly magnificent doll is designed. I have shared gingerbread amigurumi patterns before. If you wish, you can examine the previous amigurumi patterns. After preparing the necessary materials for the pattern, you can start working with crochet. When you examine the ready version of the amigurumi doll, you will see that it is crocheted in two different ways. The first is made with an ordinary yarn and the other is made with velvet yarn.
Actually, velvet yarn has different advantages. You can see this on gingerbread amigurumi. Amigurumis made using velvet rope are slightly larger and have a structure that hides mistakes. When you do it with the same number of stitches, you will see that it is noticeably larger. Now let’s crochet the gingerbread amigurumi step by step.
PDF Cute Crochet Gingerbread Amigurumi Free Pattern
Designer: scandistyle_dolls
Materials
1.Yarn (beige, white, red, green). I have beige and white – Vita Brilliant (380 m /100 g), white for glaze – Iris (fine thread), red and green – YarnArt Jeans yarn divided in half. Any yarn can be used.
2.Crochet hook, I have Clover size 1,5 mm. 3. Plastic eyes size 3 mm, glue.
4.White fine thread for mouth embroidery, I have Iris yarn. And some threads of different colors for sprinkling.
5. Polyester fiberfill, needle, pins, scissors.
Size of the finished toy is 8-9 cm.
Abbreviations
MR – magic (amigurumi) ring
ch – chain
sc – single crochet
dc – double crochet
hdc – half double crochet
inc – increase
dec – decrease
slst – slip stitch


Legs
Beige.
Rnd 1 – 6 sc in MR
Rnd 2 – 6 inc (12)
Rnd 3 – (1 sc, inc)*6 (18)
Rnd 4-6 – 18 sc (3 rounds)
Rnd 7 – 18 sc (alternate: 1 sc white, 1 sc beige, and so on to the end of the round)
Rnd 8 – white 18 sc, cut off the white thread, continue with beige:
Rnd 9-11 – 18 sc (3 rounds)
Cut the thread on the first leg, make the second leg similarly, do not cut the thread on the second leg.
Continue crocheting the body.
Rnd 12 – join the first leg to the second one: 15 sc along the first leg (do not crochet 3 stitches on the leg), skip 3 stitches on the second leg and work 15 sc, place marker.
Rnd 13-20 – 30 sc (8 rounds)
Rnd 21 – (8 sc, dec)*3 (27)
Rnd 22 – (7 sc, dec)*3 (24)
Rnd 23 – 24 sc – stuff.
Rnd 24 – 12 dec (12) – next go to crocheting the head, do not cut off the thread.
Head
Rnd 25 – 12 inc (24)
Beige.
Rnd 26 – (3 sc, inc)*6 (30)
Rnd 27 – (9 sc, inc)*3 (33)
Rnd 28-34 – 33 sc (7 rounds)
Rnd 35 – (9 sc, dec)*3 (30)
Rnd 36 – (3 sc, dec)*6 (24)
Rnd 37 – (2 sc, dec)*6 (18)
Rnd 38 – (1 sc, dec)*6 (12) – stuff.
Rnd 39 – 6 dec
Cut the thread, tighten the opening with a needle, secure the thread and weave in the ends. Sew up the hole that formed when the legs were joined.
Arms (make 2)
Rnd 1 – 6 sc in MR
Rnd 2 – 6 inc (12)
Rnd 3 – (3 sc, inc)*3 (15)
Rnd 4– 15 sc
Rnd 5 – 15 sc (alternate: 1 sc white, 1 sc beige, and so on to the end of the round)
Rnd 6 – white 15 sc, cut off the white thread, continue with beige:
Rnd 7-8 – 15 sc (2 rounds)
Stuff. Cut off the thread, leave a thread for sewing.
Scarf
Make 40 ch (or any other number of stitches so that you could tie the scarf around the toy’s neck), from the second stitch from the hook work 39 sc.
Glaze
White (I used Iris thread, crochet hook size 1,5 mm).
Base:
Rnd 1 – 6 sc in MR
Rnd 2 – 6 inc (12)
Rnd 3 – (1 sc, inc)*6 (18)
Rnd 4 – (2 sc, inc)*6 (24)
Then we need to make drips for the glaze, I have a combination of the following schemes in no particular order, simply work 1-2 sc between the drips:
– make 6 ch, from the second stitch from the hook: 2 sc, 2 hdc, dc
– make 5 ch, from the second stitch from the hook: 2 sc, 2 hdc
– make 4 ch, from the second stitch from the hook: 1 sc, 2 hdc
– make 3 ch, from the second stitch from the hook: 1 sc, 1 hdc
– (sc, hdc, 3 dc in 1 stitch, hdc, sc)
Work 1 round of drips combining different scemes, then cut off the thread, leave a long thread for sewing.
Berry with a leaf
Red (divide YarnArt Jeans thread in half).
Rnd 1 – 6 sc in MR
Rnd 2 – 6 inc (12)
Rnd 3-5 – 12 sc (3 rounds)
Rnd 6 – 6 dec
Stuff a little, tighten the opening, cut off the thread, leave a thread for sewing.
Attach a green thread (divide YarnArt Jeans thread in half) to the center of the top of the berry, make 4 ch, from the second stitch from the hook work 3 sc. Secure the thread, weave in the ends.
Assembly
1. Sew on the arms 2 rounds lower the head.
2. Glue on the eyes between 6th and 7th rounds of the head (counting from the beginning of the head crocheting – this is the round with 12 increases), 6-7 sc between the eyes.
3. Embroider a smile with a fine white thread on 4th round, 4-5 sc wide.
4. Buttons: cut a thread about 30 cm long, make a loop, pass one of the ends of the thread in this loop 5-6 times, then carefully pull both ends making a little ball. Make 3 buttons like that, then sew them on between 13th and 14th rounds, 16th and 17th rounds, and between 19th and 20th rounds.
5. Sew the glaze on top of the head, then embroider the multi-colored sprinkles with small stitches, sew the berry on top.
6. Tie the scarf around the neck.
