


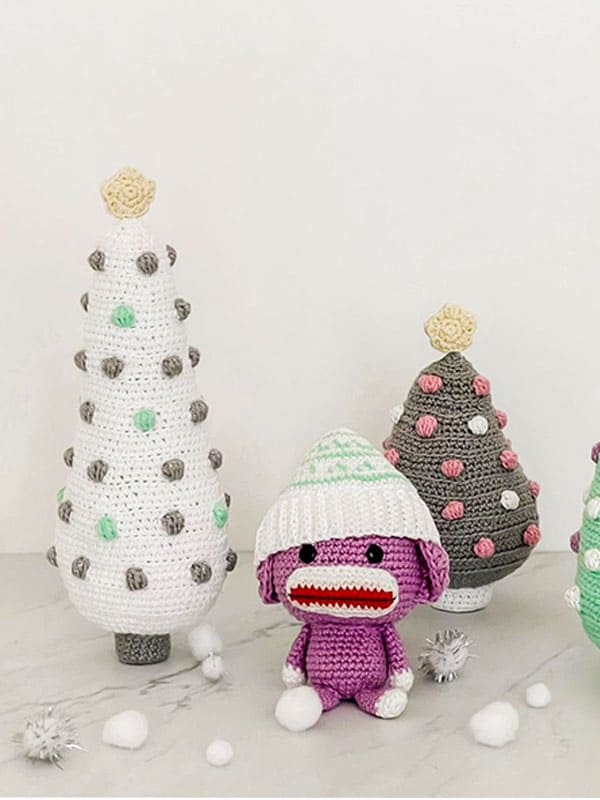
Hi everyone,I shared with you the most beautiful amigurumi tree pattern for New Years day. You can make the amigurumi tree pattern step by step very easily. You can crochet free pattern amigurumi christmas tree pattern for children and your loved ones. You can decorate your home or office by crocheting the amigurumi pattern in different colors for New Year’s Day. You can take this amigurumis tree pattern as a gift when you go to visit your loved ones on New Year’s Eve. Thanks to the creator of the amigurumi christmas tree pattern.
The amigurumi Christmas tree pattern is very easy to do. We start crocheting the amigurumi tree pattern from the trunk. You can get help from the coins to keep the tree pattern stable. You can weave the ornaments into the amigurumi tree pattern using whatever colored yarn you want. You can enlarge the star on top of the Amigurumi tree pattern a bit. Don’t forget to add the amigurumi christmas tree pattern to your favorites list.
PDF Crochet Christmas Tree Amigurumi Free Pattern
Designer
Instagram: yarn.ami
Materials
• Yarn: Super Fine (Weight 1) Cotton 8/4
• Yarn colors used (4) seafoam green (G), sparkly white (W), sparkly purple (P), & pastel yellow (Y)
• 3.25 mm crochet hook
• Polyester fiber fill
• Washer, polyester pellets, coins, or etc, for added weight to hold down doll
• Wide-eyed needle for sewing Amigurumi parts, pins, & scissors


Abbreviations
MR – Magic Ring
Ch – Chain
St / sts – Stitch / Stitches
Sc – Single Crochet
Hdc – Half double crochet
Dc – Double crochet
Inc – Increase
Dec – Decrease (use invisible dec) SI St – Slip Stitch
BS – Bobble Stitch
(…) x n – repeat pattern in brackets number (n) of times indicated
n – total number (n) of stitches In row
We are going to crochet the body part of the Amigurumi tree pattern 🙂
Tree Body
Stuff as you go.
The body will be made with color G. Each BS will be made with colors W and P.
Rnd1. sc 8 in MR (8)
Rnd2. (inc) x 8 (16)
Rnd3. (inc, sc) x 8 (24)
Rnd4. (inc, sc 3) x 6 (30)
Rnd5. (sc 2, inc, sc 2) x 6 (36)
Rnd6. (inc, sc 5) x 6 (42)
Rnd7. (sc 3, inc, sc 3) x 6 (48)
Rnd8. (inc, sc 5) x 8 (56)
Rnd9. (sc 3, inc, sc 3) x 8 (64)
Rnd10. in BLO, sc around (64)
Rnd11. sc around (64)
Rnd12. in BLO, sc around (64)
Rnd13. Using color W for each BS, ( BS, sc 7, BS, sc 6, inc) x 4 (68)
Rnd14. sc around (68)
Rnd15. in BLO, sc around (68)
Rnd16. (sc 15, dec) x 4 (64)
Rnd17. in BLO, sc around (64)
Rnd18. sc around (64)
Rnd19. Using alternating colors P and W for each BS. (sc 7, BS, sc 7, BS) x 4 (64)
Instructions for Bouble Stitch
With bouble color ( W or P). YO pull a loop through next stitch. YO and pull through
2 loops. Repeat sequence 4 more times in same stitch. To close BS. Use body color
G and YO and pull through all 6 loops on hook
Rnd20. (sc 14, dec) x 4 (60)
Rnd21. in BLO, sc around (60)
Rnd22. (sc 13, dec) x 4 (56)
Rnd23. in BLO, sc around (56)
Rnd24. Using color W for each BS ( sc 3, BS, sc 3) x 8 (56)
Rnd25. (sc 12 dec) x 4 (52)
Rnd26. in BLO, sc around (52)
Rnd27. (sc 11, dec) x 4 (48)
Rnd28. (BLO) sc around (48)
Rnd29. Using alternating colors P and W for each BS, (BS, sc 7, BS, sc 7) x 3 (48)
Rnd30. (sc 6, dec) x 6 (42)
Rnd31. in BLO, sc around (42)
Rnd32. sc around (42)
Rnd33. in BLO, sc around (42)
Rnd34. Using color W for each BS, (sc 3, BS, sc 3) x 6 (42)
Rnd35. (sc 5, dec) x 6 (369
Rnd36. in BLO, sc around (36)
Rnd37. sc around (36)
Rnd38. in BLO, sc around (36)
Rnd39. Using alternating colors P and W for each BS, (sc 6, BS, dec, sc 6, BS, dec) x 2 (32)
Rnd40. sc around (32)
Rnd41. (sc 3, dec, sc 3) x 4 (28)
Make sure the body is stuffed
Rnd42. (sc 5, dec) x 4 (24)
Rnd43. in BLO, (sc 2, dec, sc 2) x 4 (20)
Rnd44. (sc 3, dec) x 4 (16)
Finish stuffing body
Rnd45. (sc, dec, sc) x 4 (12)
Rnd46. (dec, sc) x 4 (8)
Fasten off and leave a short tail to sew body close.
Tree Stump
Rnd1. sc in MR (6)
Rnd2. (inc) x 6 (12)
Rnd3. (inc, sc) x 6 (18)
Rnd4. (sc, inc, sc) x 6 (24)
Rnd5. in BLO, sc around (24)
Rnd6. sc around (24)
Let’s make the star of the amigurumi tree pattern 🙂
Star
Make 2
Rnd1. sc 5 in MR (5)
Rnd2. (inc) x 5 (10)
Rnd3. ((hdc, dc and hdc in one st), slst in next)
Repeat sequence 4 more times (20)
Fasten off and leave long tail to sew.
Assembly
1. Align the two star pieces (back to back) and sew all around the adges until almost closed.
Stuff as preferred and sew close. Fasten off and leave the rest of the tail to sew star on top of the tree body.
2. Using pins, align the tree stump in the center at the bottom of the tree body. Add in weight if using. Add stuffing as needed and sew around adges to close.
Fasten off and weave in ends. You’re finished.
Congratulations, you have completed the amigurumi Christmas tree. 🙂

