


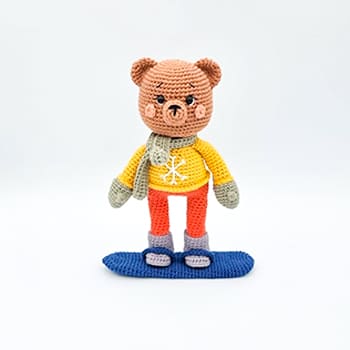
Hi everyone,It’s almost Halloween time. You should take a look at this recipe for the most beautiful amigurumi pattern. The amigurumi pumpkin bear pattern is very easy to do step by step. You just need to have basic knowledge of Crochet. Thanks to the creator of the amigurumi pattern. When the amigurumi bear pattern is completed, it will be small enough to fit on the palm. You can use it as a keychain in your home or car. You can decorate your baby’s crib. You can make the amigurumi pumpkin bear pattern in different colors. You can decorate around your fireplace by making a red hat and red sweater for Christmas.
The amigurumi pumpkin bear pattern is very easy to make. You can use threads that you don’t use at home. A pumpkin is made on the head of the amigurumi bear pattern. It will be the cutest amigurumi toy for Halloween. You can make the eyes of the free pattern using plastic accessories. If desired, you can crochet with black yarn. The head part of the amigurumi pattern is crocheted with light brown yarn. His ears are crocheted with the same yarn. You can use white yarn if you want. This amigurumi bear jumper is crocheted with orange yarn. If you want, you can use light blue or light green yarn. Don’t forget to add the Amigurumi pumpkin bear pattern to your favorites list.
PDF Crochet Halloween Bear Amigurumi Free Pattern
Designer
Instagram: maiacraft
Materials
• Yarn: Cotton VN 1mm
• Crochet hook 2.0 mm
• Black eyes
• Fiberfill
• Tapestry needle
• Scissors
• Stitch marker
ABBREVIATIONS
Mr: Magic ring
Sc: Single crochet
Inc, Dec: Increase, Decrease
hdc– half double crochet
(…) x n: Repeat instructions in brackets n times
Let’s start crocheting amigurumi pumpkin bear pattern. We will make the first part of the head of the pattern. You can crochet with light brown yarn. 🙂
HEAD
Rnd 1.MR 6 SC (6)
Rnd 2. 6 inc (12)
Rnd 3. (sc, inc) x 6 (18)
Rnd 4. (2 sc, inc) x 6 (24)
Rnd 5. (3 sc, inc) x 6 (30)
Rnd 6. (4 sc, inc) x 6 (36)
Rnd 7. (5 sc, inc) x 6 (42)
Rnd 8-15. 42 sc (42) (8 rnds)
Rnd 16. (5 sc, dec) x 6 (36)
Rnd 17. (4 sc, dec) x 6 (30)
Rnd 18. (3 sc, dec) X 6 (24)
Rnd 19. (2 sc, dec) x 6 (18)
Fasten off.
We are going to crochet the ears of the amigurumi bear pattern. Light brown yarn is preferred to make the ears. After completing the ears, sew the head of the Amigurumi bear.
EARS
Rnd 1. MR 6 sc (6)
Rnd 2. Turn 6 inc (12)
Rnd 3. Turn 12 sc (12)
Fasten off. Leaving a long tail for sewing
MUZZLE
Rnd 1. MR 6 sc (6)
Rnd 2. 6 inc (12)
Rnd 3. 12 sc (12)
Fasten off. Leaving a long tail for sewing
After completing the mouth part of the amigurumi pumpkin bear pattern, let’s crochet the body and legs together. 🙂
LEGS & BODY
First leg:
Rnd 1. MR 6 sc (6)
Rnd 2. (2 sc, inc) X 2 (8)
Rnd 3-4. 8 sc (8)
Second leg:
Repeat R1 – 4 but not cut the yarn.
Chain 4 and join both legs
Rnd 5. 24 sc (24)
Rnd 6. (3 sc, inc) x 6 (30)
Rnd 7. Orange 30 sc (30)
Rnd 8. (3 sc, dec) x 6 ( 24)
Rnd 9-10. Yellow 24 sc (24)
Rnd 11-12: Orange 24 sc ( 24)
Rnd 13. (2 sc, dec) x 6 (18)
Fasten off. Leaving a long tail for sewing.
We crochet the arms of the amigurumi toy. Orange and light brown thread is preferred to make the arms.:)
ARMS
Rnd 1. Brown. MR 7 sc (7)
Rnd 2-3. 7 sc (7)
Rnd 4-5. Orange 7 sc (7)
Fasten off. Leaving a long tail for sewing
COLLAR
Chain 4. Start at the second ch from hook.
Rnd 1. 3 sc (3)
Rnd 2-20. Chain 1 BLO 3 sc (3)
Fasten off. Leaving a long tail for sewing
We crochet the pumpkin on the head of the Amigurumi bear pattern. 🙂
PUMPKIN
Work in rows.
Chain 21
Rows 1 to 25 – starting in 2nd ch from hook, 20 hdc, ch 1. turn.
Don’t cut the yarn and start the assembly.
STEM
Work in a spiral.
Rnd 1 5 sc in MR
Rnd 2 to 4 5 sc (5)
Cut the yarn leaving a long tail to sew.

Download PDF Pattern


I see that the directions stop after the stem. Are there additional instructions for how to finish the pumpkin?