


Hello friends, today I will share a cute yeti amigurumi pattern. First of all, I would like to thank sweetoddityart for this amazing yeti pattern. A truly gorgeous and highly detailed crochet yeti amigurumi pattern. The Yeti pattern is completely free and you can easily make all the pieces. It is quite detailed. So you can easily do it yourself. However, I must say that it is an advanced amigurumi pattern. I want to continue to share such doll amigurumi patterns. Please do not give up your support for me.
If we talk about the parts of the yeti amigurumi, it consists of quite a lot of parts. However, when you complete all the pieces, you will have a truly magnificent Yeti amigurumi. Now let’s crochet the Yeti amigurumi step by step.
PDF Crochet Yeti Amigurumi Free Pattern Step By Step
Designer:
Etsy: sweetoddityart
Instagram: sweetoddityart
Materials Needed:
Yarn: Bernat Velvet yarn, Worsted weight #4, approximately 150g of main color, 50-75g of accent colors.
Color A: Velvet White yarn, Color B: Blue, Color C: Light Blue, Color D: Gray, Color E: Brown, Color F: Dark Blue, Color G: Purple
Hook Size: D Hook or 3.25 mm
21 mm safety eyes
Scissors, sewing needle, stitch marker, fiberfill stuffing
Size:
19 inches from foot to top of head with weight 4 yarn and a 3.25 mm hook
Skill Level Needed:
Intermediate- suitable for novice crocheters, requires patience and precisions when assembling
the yeti and basic crochet skills.
Abbreviations:
mr= magic ring- crochet single crochet stitches in to the adjustable loop
BLO= back loops only
ch= chain stitch
F/O= Fasten off
sc= single crochet stitch
inc3= 3 sc in the same stitch
sl= slip stitch
hdc= half double crochet
dc= double crochet stitch
tr= triple crochet
inc= increase- make two single crochet stitches in the same stitch
dec=decrease- crochet two stitches together using the decrease method
(4 sc, inc) x 6= repeat the pattern between parentheses 6 times
Notes:
• Do not join rounds unless stated, work in a continuous spiral
• Use a stitch marker to mark the beginning of each round
• All stitches are worked in both loops unless stated otherwise in the pattern


Head:
Crocheted from top of head to bottom
With Color B:
1. Make 6 sc into a magic ring= 6
2. Increase in each st around= 12
3. (sc, inc) x 6= 18
4. sc, inc, (2 sc, inc) x 5, sc= 24
5. (3 sc, inc) x 6= 30
6. 2 sc, inc, (4 sc, inc) x 5, 2 sc= 36
7. (5 sc, inc) x 6= 42
8. 3 sc, inc, (6 sc, inc) x 5, 3 sc= 48
9. (7 sc, inc) x 6= 54
10. 4 sc, inc, (8 sc, inc) x 5, 4 sc= 60
11. (9 sc, inc )x 6= 66
12-21. sc in each st around
Place eyes between rounds 16 and 17 of the head, leaving 15 holes between them.
22. (9 sc, dec) x 6= 60
23. 4 sc, dec, (8 sc, dec) x 5, 4 sc= 54
24. (7 sc, dec) x 6= 48
25. 3 sc, dec, (6 sc, dec) x 5, 3 sc= 42
26. (5 sc, dec) x 6= 36
Start stuffing the head
27. 2 sc, dec, (4 sc, dec) x 5, 2 sc= 30
28. (3 sc, dec) x 6= 24
F/O and leave a small tail

Hood:
With Color A:
Repeat rounds 1-11 of the head.
12-22. sc in each st around(You may need to adjust the amount of rounds to fit your head, try
the hood on as you work and see if you need more rounds or less)
23. (9 sc, dec) x 6= 60
F/O and leave a small tail. Your hood will cover half of your head opening
Body:
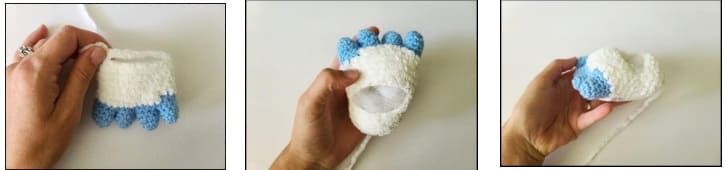
Feet(Make 2):
Starting with Color B:
Toes(Make 4):
1. Make 6 sc into a magic ring= 6
2. (sc, inc) x 3= 9
3-4. sc in each st around
Do not F/O the 4th toe!
Connect the toes: Join the 1st and 2nd toe with a sc, work 3 more sc on the 2nd toe, work 4 sc on
the 3rd toe, work 9 sc on the 4th toe, work 5 sc on the 3rd toe, work 5 sc on the 2nd toe, work 9 sc
on the 1st toe= 36
Change to Color A:
1. (4 sc, dec) x 6= 30
2. (3 sc, dec) x 6= 24
3. (3 sc, inc) x 6= 30
4-5. sc in each st around
6. (8 sc, dec) x 3= 27
7. Ch 9, skip 9 stitches, sc in remaining 18 stitches= 27
8. (7 sc, dec) x 3= 24
9. sc in each st around
Stuff the feet as you work
10. (6 sc, dec) x 3= 21
11. (5 sc, dec) x 3= 18
12. (sc, dec) x 6= 12
13. Dec x 6= 6
F/O and sew the hole closed
Body Continued:
With Color A:
Turn your foot upside down and find the middle stitch. Refer to pictures on next page. Mark
that and attach the yarn with a sl st. Crochet around the opening of the foot= 20 sc
1. (4 sc, inc) x 4= 24
2-3. sc in each st around
4. (11 sc, inc) x 2= 26
5-6. sc in each st around(Mark the 20th stitch on round 6 of the first leg with a stitch marker)
Do not F/O the 2nd leg!
Connect the legs:
(you may need to work a few more single crochets on the 2nd leg to make the legs line up correctly)
7. Ch 4, work a sc on the 1st leg to connect, work 25 more sc around the 1st leg, Work 4 sc on the back of the chain 4, work 26 sc on the 2nd leg, work 4 sc on the front of the chain= 60
8. (9 sc, inc) x 6= 66
9. (10 sc, inc) x 6= 72
10-16. sc in each st around
17. (10 sc, dec) x 6= 66
18-19. sc in each st around
20. (9 sc, dec) x 6= 60
21. sc in each st around
22. (18 sc, dec) x 3= 57
23. sc in each st around
24. (17 sc, dec) x 3= 54
25. sc in each st around
26. (16 sc, dec) x 3= 51
27. sc in each st around
Stuff the body as you work
28. (15 sc, dec) x 3= 48
29. sc in each st around
30. (14 sc, dec) x 3= 45
31. sc in each st around
32. (13 sc, dec) x 3= 42
33. sc in each st around
34. (12 sc, dec) x 3= 39
35. sc in each st around
36. (11 sc, dec) x 3= 36
37. Sc in each st around
38. (10 sc, dec) x 3= 33
39. (9 sc, dec) x 3= 30
40. (8 sc, dec) x 3= 27
41. (7 sc, dec) x 3= 24
42. Sc in each st around
F/O and leave a long tail for sewing
Arms(Make 2):
With Color B:
Starting with thumb:
1. Make 4 sc into a magic ring= 4
2. (inc, sc) x 2= 6
3-4. sc in each st around
F/O

Fingers(Make 3):
1. Make 4 sc into a magic ring= 4
2. (inc, sc) x 2= 6
3-5. sc in each st around
Do not F/O 3rd finger. Start connecting the fingers Make a sc on the 2nd finger to connect, make 2 more sc on the 2nd finger, make 6 sc on the 3rd finger, make 3 sc on the 2nd finger, make 6 sc on the 1st finger= 18
6-7. sc in each st around
8. Make 5 sc, make 3 sc through the thumb and hand, make 10 more sc= 18
9. Make 5 sc, make 3 sc onto the thumb only, make 10 sc= 18
Arms Continued:
10. (4 sc, dec) x 3= 15
11. (3 sc, dec) x 3= 12
Change to Color A:
Start stuffing the arms. I do not stuff fingers.
12. Increase in each st around= 24
13. sc in each st around
14. (2 sc, dec) x 6= 18
15-16. sc in each st around
17. Dec, 16 sc= 17
18-19. sc in each st around
20. Dec, 15 sc= 16
21-22. sc in each st around
23. Dec, 14 sc= 15
24-25. sc in each st around
Stop stuffing the arms
26. Dec, 13 sc= 14
27. sc in each st around
28. Dec, 12 sc= 13
29. sc in each st around
30. Dec, 11 sc= 12
Fold the arm in half and sc the opening closed. F/O and leave a long tail for sewing
Horns:
With Color E:
1. Make 6 sc into a magic ring= 6
2. sc in each st around
3. (inc, sc) x 3= 9
4-6. sc in each st around
7. (inc, sc) x 4, sc= 13
Stuff the horns as you work
8. sc in each st around
9. dec, 4 sc, inc, 6 sc= 13
10. (inc, sc) x 6, sc= 19
11. Dec, 7 sc, inc, 9 sc= 19
12. Dec, 6 sc, dec, 9 sc= 17
13-14. Sc in each st around
F/O and leave a long tail for sewing
Belly:
With Color B:
Ch 6
1. sc in 2nd ch from hook, 3 sc, inc3, working on the opposite side of the chain: Work 3 sc, inc= 12
*Refer to the help section on pg. 18 for example of working on the opposite side of the chain*
2. inc, 3 sc, inc x 3, 3 sc, inc x 2= 18
3. sc, inc, 4 sc, inc, sc, inc, sc, inc, 4 sc, inc, sc, inc= 24
4. (3 sc, inc) x 6= 30
5. 3 sc, inc x 3, 15 sc, inc x 3, 12 sc= 36
F/O and leave a long tail for sewing

Ears:
Make 2 in Color A and 2 in Color B:
Staring with Color B:
1. Make 6 sc into a magic ring= 6
2. Increase in each st around= 12
3. (sc, inc) x 6= 18
4. (2 sc, inc) x 6= 24
Do not F/O Color A ears! Start working around the Color B ears to crochet them together. Place the back sides of both color ears together. Sc around the edges of both ears to connect them.
F/O and leave a long tail for sewing.

Goggles:
Starting with lens:
With Color F:
Right Lens:
1. Make 8 sc into a magic ring= 8
2. Increase in each st around= 16
3. (sc, inc) x 8= 24
4. sc, inc, (2 sc, inc) x 3, 2 hdc, hdc-inc, 2 dc, dc-inc, tr, tr-inc, dc-inc, hdc, 2 sc= 32
Left Lens:
1. Make 8 sc into a magic ring= 8
2. Increase in each st around= 16
3. (sc, inc) x 8= 24
4. (2 sc, inc) x 4, 2 sc, hdc, dc-inc, tr-inc, tr, dc-inc, 2 dc, 3 hdc, 7 sc(You will be moving the stitch marker, which is why your stitch count is more in this round)
Connecting the lens: Work 4 sl stitches across the middle of the lenses to connect them together.
Goggles Continued:
1. work 27 sc around the edge of the lens, sl st in the divot on the bottom of the lenses, work 27 sc more around the right lens, work 3 dc in the divot on top.
Change to Color D:
2. BLO Hdc around
3. Hdc in each st around
F/O and weave in your tail ends.

Google Strap:
Attach Color D yarn to the side of the goggles with a sl st. Ch approximately 61. You may need to adjust this number. Try to see if the chain wraps around the yeti’s head when you put the goggles on his face.
Attach to the opposite side of the goggles with a sl st, turn and sc across the chain.
F/O and weave in the ends.

Snowboard:
Make one in Color C and one in Color D
Starting with Color C:
Ch 36
1. sc in the 2nd chain from hook, 33 sc, inc3 in the last chain, working on the opposite side of the chain: 33 sc, inc in the last chain= 72
2. inc, 33 sc, inc x 3, 33 sc, inc x 2= 78
3. sc, inc, 33 sc, (sc, inc) x 3, 33 sc, (sc, inc) x 2= 84
4. 2 sc, inc, 33 sc, (2 sc, inc) x 3, 33 sc, (2 sc, inc) x 2= 90
5. 3 sc, inc, 33 sc, (3 sc, inc) x 3, 33 sc, (3 sc, inc) x 2= 96
Do not F/O the Color D board
Place the back sides of both boards together and sc around the edges to connect them together.
F/O and weave in the ends.
Bindings:
With Color D:
Ch 12
1. sc in the 2nd chain from hook and across= 11
F/O and leave a long tail for sewing
Scarf:
With Color F:
Ch 110
1. Hdc in 2nd chain from hook and across
F/O and leave a medium tail for sewing.
You have your finished Shaun the Yeti! Thank you for your purchase! If you have any questions or concerns please email me at [email protected] or etsy convo me. I will get back to you asap. Please share your finished yeti with me as often as you want! I love seeing them!
Assembly
Head and Body:
1. Thread your needle with a long strand of black yarn. Insert the needle into the bottom of the head and bring the needle to a hole approximately between rounds 20 and 21. Embroider a smile.
2. Cut a long strand of white thread and insert the needle into the bottom of the head.
Bring the needle up to the smile. Embroider a triangle for a tooth on each side of the smile. Weave in the ends.
3. Sew your head to your body. You may need to add more stuffing as you close the hole.

Arms:
1. Pin the arms to the side of the body approximately between rounds 41 and 42 of the body.
2. Sew the arms onto the body.
Belly:
1. Pin the belly onto the front of the body. Try to place the belly 5 rounds above the
legs. Its not easy to count rounds with the velvet yarn.
2. Sew the belly onto the body.
Horns:
1. Pin the horns on top of the head approximately between rounds 16 and 20.
2. Sew the horns onto the top of the head.
Ears:
1. Pinch your ears and sew closed about 3 stitches. Pin the ears next to the horns.
2. Sew the ears onto the head.
Snowboard and scarf:
1. Pin the bindings onto the board. Sew the bindings onto the board. Weave in the ends.
2. Take your scarf and cut 12 medium strands of purple yarn. Attach the strands to the ends of the scarfs. Cut the strands to the length you want. Wrap the scarf around your yeti.
Helpful Tips:
Exact Colors and Brand of Yarn Used:
1. Velvet yarn: Bernat Velvet yarn
2. Blue: Big Twist Cornflower Blue
3. Light Blue: Big Twist Light Blue
4. Gray: I love this yarn Charcoal
5. Purple: I love this yarn Orchid
6. Dark Blue: I love this yarn Blue
You can use different eye and nose sizes. You might have to adjust the placements if you change the sizes.
You can use different hook sizes and weights of yarn. It will just change the size of your yeti and you might need to adjust eye and nose placement.
How you stuff matters! The type of stuffing you use, how you stuff, all this matters on how your yeti turns out. I prefer Polyfil stuffing but you can use other types.
I painted my own eyes for yeti but there are great vendors with some really great eye selections.
Working on the opposite side of the chain:
This is an example picture!
Start by creating your foundation chain. The amount of chains will be given in your pattern.
Work the stitches given across the chain.
Now, turn your work upside down into the remaining back loops of the chain stitches.
Work the next stitches into the back chains across.
When you are finished, the last stitch you made will be next to your first stitch.
*The number of stitches you make on one side of the chain should be the same amount on the opposite side of the chain. Depending on what you are making you may join the end of your round to the beginning with a slip stitch, or you may continue crocheting in a spiral fashion. If you are to join this will be indicated in the pattern you are making.


