


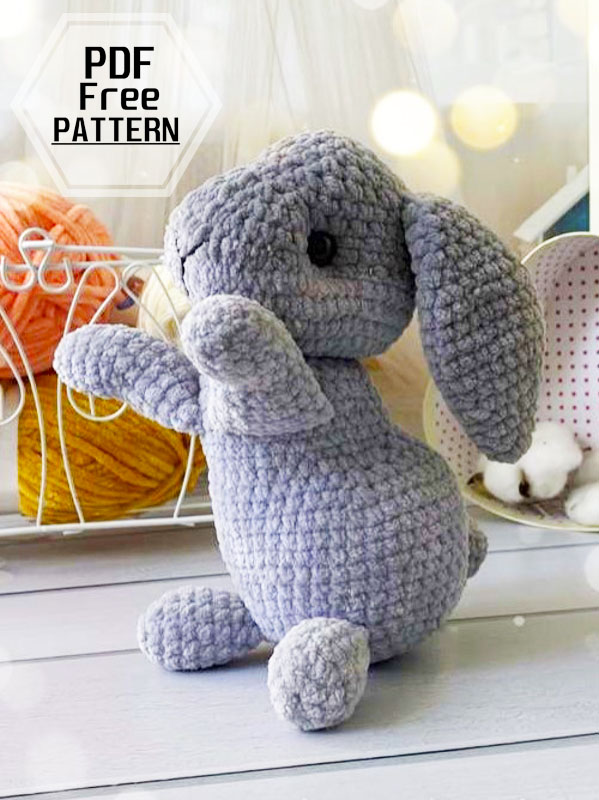
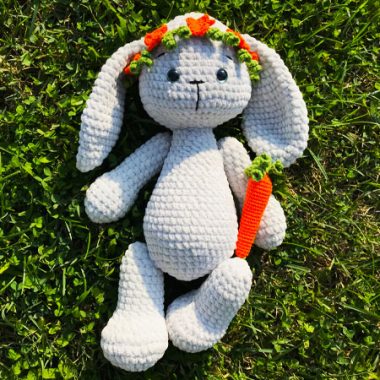
Hello my dears. Today we’re going to make a pretty easy bunny amigurumi. We will make the crochet bunny using velvet yarn. It’s on an easy level. Now if you’re ready, let’s get start and make this cute bunny amigurumi. When using the specified materials and crocheting method, the size toys is 20 cm. Difficulty level is easy. We crochet in a spiral, without a tch, unless otherwise stated in description. Use a marker to mark the first stitch of the row. Enjoy your crocheting and even loops!
PDF Easy Plush Crochet Bunny Lelya Amigurumi Free Pattern
Designer: land_plush
Necessary materials
✓ Yarn Himalaya Dolphin Baby 80351, (gray) – 1 skein,
✓ YarnArt Jeans yarn (black) – a little, to decorate the spout,
✓ Hook number 4,
✓ Eyes 12-13 mm,
✓ Scissors, needles, yarns, filler, tightening yarn.
And good mood!
Abbreviations
MR: Amigurumi Magic ring
sc : Single Crochet
inc : Increase
dec : Decrease
tr : Triple Crochet/ Treble Crochet
st: Stitch
dc : Double Crochet
hdc: Half Double Crochet
slst : Slip Stitch
ch : Chain
..in : make increase into same stitch as many as the number which is given in front of “inc” abbreviation (exp; 3inc, 4inc..).
FLO : Crochet into front loops only
BLO : Crochet into back loops only

Legs
1. 6 sc in MR (6)
2. 6 inc (12)
3-6. 12 sc (4 rows)
Tightly fill the beginning of the leg
7. (1 sc, dec) х4 (8)
8. 8 sc
We fasten the yarn and cut it off.
When crocheting into the body, fold the part in half.

Arms
1. 5 sc in MR (5)
2. 5 inc (10)
3. 10 sc
4. (4 sc, inc) х2 (12)
5. 12 sc
6-8. 5 slst, 7 sc (12) (3 rows)
9. (5 sc, inc) х2 (14)
10-12. 14 sc (3 rows)
We fasten the yarn and cut it off.
When crocheting into the body, fold the part in half.

Body and Head
1. 6 sc in MR (6)
2. 6 inc (12)
3. (1 sc, inc) х6 (18)
4. (2 sc, inc) х6 (24)
5. (3 sc, inc) х6 (30)
6. (4 sc, inc) х6 (36)
7. (5 sc, inc) х6 (42)
8. 15 sc, 4 sc with leg, 4 sc, 4 sc with leg, 15 sc (42)
9-11. 42 sc (3 rows)
12. (6 sc, inc) х6 (48)
13-15. 48 sc (3 rows)
16. (7 sc,dec) х2, 15 sc, dec, 7 sc, dec, 4 sc (44)
17. 7 sc, 2 dec, 2 sc, 2 dec, 14 sc, 2 dec, 2 sc, 2 dec, 1 sc, dec (35)
18. (1 sc, dec) х2, 1 sc, 3 dec, 14 sc, 3 dec, 2 sc (27)
19. 4 sc, (3 sc, inc) х5, inc, 2 sc (33)
20-21. 33 sc (2 rows)
The arms should be parallel above the legs.
22. (1 sc, dec) х2, 3 sc, inc, (with arm 3 sc, inc, 3 sc), inc, (with arm 3 sc, inc, 3 sc), inc, 1 sc, (1 sc, dec) х2 (34)

We fill the detail
23. 34 sc
24. 4 sc, dec, (3 sc, dec) х5, 3 sc (28)
25. (4 sc, dec) х4, 4 sc (24)
26. (2 sc, dec) х6 (18)
27. (2 sc, inc) х6 (24)
28. (3 sc, inc) х6 (30)
29. (4 sc, inc) х6 (36)
30. (5 sc, inc) х2, (1 sc, inc) х6, (5 sc, inc) х2 (46)
!Further, the selected increases and decreases form a muzzle and fit strictly in the middle!
31. 14 sc, (2 sc, inc) х2, (2 sc, inc) х2, (2 sc, inc) х2, 14 sc (52)
32. 22 sc, (3 sc, inc) х2, 22 sc (54)
33. 54 sc
34. (7 sc, dec) х6 (48)
35. (6 sc, dec) х6 (42)
36. 12 sc, (1 sc, dec) х2, (1 sc, dec) х2, (1 sc, dec) х2, 12 sc (36)
37. 12 sc, (dec) х6, 12 sc (30)
38. 30 sc
39. (3 sc, dec) х6 (24)
We insert the eyes between 35, 36 rows, between them 14 sc. We fill the detail.
40. (2 sc, dec) х6 (18)
41. (1 sc, dec) х6 (12)
42. 6 dec
Cut the yarn, tighten the hole, hide the end of the yarn.

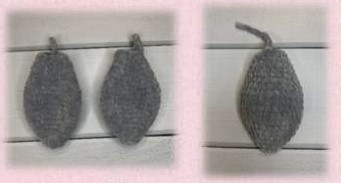
Ears
1. 6 sc in MR (6)
2. 6 inc (12)
3. 12 sc
4. (1 sc, inc) х6 (18)
5. (2 sc, inc) х6 (24)
6. 24 sc
7. (3 sc, inc) х6 (30)
8-11. 30 sc (4 rows)
12. (3 sc, dec) х6 (24)
13. 24 sc
14. (2 sc, dec) х6 (18)
15-16. 18 sc (2 rows)
17. (1 sc, dec) х6 (12)
18-19. 12 sc (2 rows)
We fasten the yarn and cut it off. Sew the ears on the sides at the level of the 38th row
Tail
1. 6 sc in MR
2. 6 inc (12)
3-4. 12 sc (2 rows)
5. (1 sc, dec) х4 (8)
We fasten the yarn and cut it off. We fill the tail and sew in the 8th row of the body.

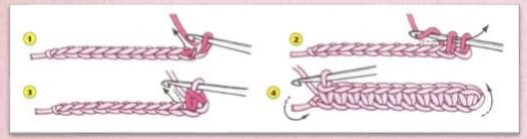
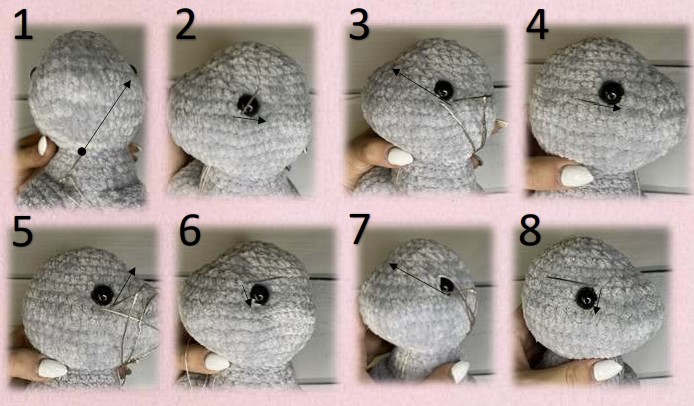
Tightening and muzzle design
We make the tightening sequentially according to the photographs. The arrows show the direction of the needle.
We insert the needle under the muzzle, in the middle. Stage 9 is the final one. We return to the starting point, pull it off, tie the yarn and hide it inside the toy. If necessary, repeat the tightening a few more times.
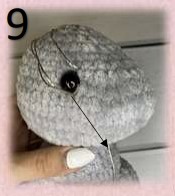
Spout embroidery
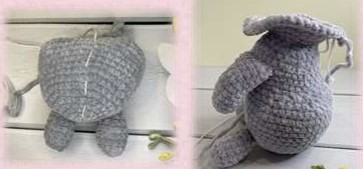
We mark two points with pins (they can be seen in photo 3).
Between 34 and 35 rows, between pins 5 sc. We embroider the nose sequentially according to the photographs. The arrows show the direction of the needle.
We insert the needle under the muzzle, in the middle. At the second stage, we bring the needle 2 sc up from the original point. At the fourth stage, we introduce the needle to the same point from where it was pulled out and return to the original point (i.e. 2 sc down).
We tie the yarn and hide it inside the toy.

There is no link to download the free pdf.
I added new link. Sorry for that.
i would love to make this bunny BUT in rows 6-8 on arms i don’t understand what “pc” stands for.
Sorry for that. It’s slst.
Obrigada por compartilhar a receita. Lindo coelho.
Where is the link for the free PDF of the pattern?