


Hello friends, a few days ago I shared a bunny amigurumi pattern. Today, I will share a teddy bear pattern made using almost the same pattern. As you know, teddy bear amigurumi patterns are among the most admired and sought-after patterns of all time. That’s why these types of amigurumi patterns have been designed recently. The crochet teddy bear pattern has a few differences from the rabbit. First of all, of course, comes the ears. In addition, an extra muzzle part was added to the teddy bear. In this way, a teddy bear pattern was made by making a big difference. I really like the teddy bear pattern. It goes without saying that the pattern is free.
You can also download the amigurumi pattern as a pdf. The amigurumi pattern is a very easy pattern for a beginner. But the only part that can challenge you is the teddy bear’s bow tie. After crocheting the last piece, your amigurumi will be ready. Now, let’s crochet the teddy bear amigurumi step by step.
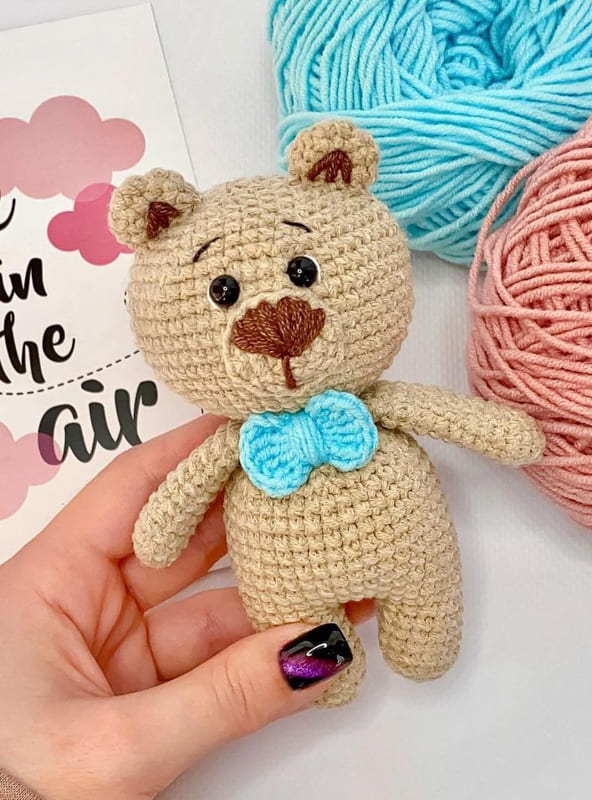
PDF Little Bear Crochet Free Amigurumi Pattern
Designer: vivi_toys
Materials and tools
Yarn:
Bunny in the first photo: Gazzal Baby Cotton
beige 3424, YarnArt Ideal violet 245
(bow), Alize Bella pink 613 (spout)
White Bunny: Alize Cotton Gold Tweed White
55, YarnArt Jeans raspberry 59 (bow);
Bear: YarnArt Jeans beige 48, blue 76
(bow), brown 70 (but sic)
Hook 2 mm
Eyes 6 mm
Filler
Pins and needles
crocheting marker
(optional)
Abbreviations
MR: Amigurumi Magic ring
sc : Single Crochet
inc : Increase
dec : Decrease
tr : Triple Crochet/ Treble Crochet
st: Stitch
dc : Double Crochet
hdc: Half Double Crochet
slst : Slip Stitch
ch : Chain
..in : make increase into same stitch as many as the number which is given in front of “inc” abbreviation (exp; 3inc, 4inc..).
FLO : Crochet into front loops only
BLO : Crochet into back loops only
Arms
1. 5 sc in MR
2. inc*5 (10)
3-11. 10 sc (9 rows)
12. (3 sc, dec)*2 (8)
Fold over the floor and sew on both sides 3 sc Cut and pull the yarn out of the loop.
We hide the part inside with a needle.
Ears
1. 6 sc in MR
2. inc*6 (12)
3. 12 sc
4. (4 sc, dec)*2 (10)
Cut off the long tip for sewing.
Muzzle
1. 6 sc in MR
2. inc*6 (12)
3. (1 sc, inc)*6 (18)
Make 1 slst and cut off the long tip for sewing.
We embroider a nose in the shape of a triangle and a small strip from it.
Legs
1. 6 sc in MR
2. inc*6 (12)
3-8. 12 sc (6 rows) We make 1 slst. Cut off the yarn at the first leg, not at the second. We will continue to crochet the torso from there.
We fill both legs.
Body
From the second leg:3 ch
1. (4 sc, inc)*6 (36)
2-11. 36 sc (10 rows)
At the end of the 5th row, in the middle, we crochet popcorn from 5 dc (tail).
12. (4 sc, dec)*6 (30)
13. (3 sc, dec)*6 (24) We fill.
14. (2 sc, dec)*6 (18)
15. 18 sc (we crochet handles on the sides)
16. (1 sc, dec)*6 (12) We fill.
We do not cut the yarn, we will continue to crochet the head.
Head
17. (1 sc, inc)*6 (18)
18. (2 sc, inc)*6 (24)
19. (3 sc, inc)*6 (30)
20. (4 sc, inc)*6 (36)
21. (5 sc, inc)*6 (42)
22. (6 sc, inc)*6 (48)
23. (7 sc, inc)*6 (54)
24-30. 54 sc (7 rows)
31. (7 sc, dec)*6 (48)
32. (6 sc, dec)*6 (42)
We cling eyes between 29 and 30 near at a distance of about 5 columns.
33. (5 sc, dec)*6 (36)
34. (4 sc, dec)*6 (30)
We fill.
35. (3 sc, dec)*6 (24)
36. (2 sc, dec)*6 (18)
37. (1 sc, dec)*6 (12)
We fill.
38. dec*6 (6)
We tighten the hole with Sew on the muzzle (if we crochet a bear), securing it with pins.
We embroider the nose (if a bunny), whites of the eyes and eyebrows.
Sew on the ears, securing them with pins.
Optionally, you can tint with dry pastels or blush / shadows.
Bow
We crochet in the MR:
(3 ch, 6 tr, 3 ch, slst) * 2, 1 ch
Cut off the long yarn. We wrap it in the middle of the bow several times.
Then we wrap the bear around the necks a couple of times, fix the yarns and hide the tips inside the toy.
ready!

