


Hello dear friends.
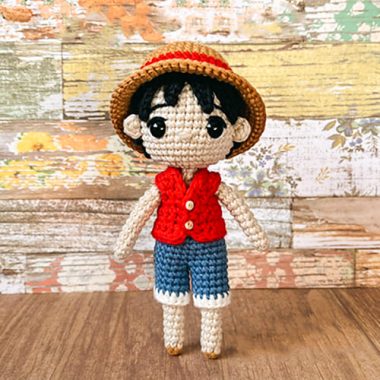
Do you like fairies? If your answer is yes, today I will give you a wonderful crochet fairy doll amigurumi pattern, completely free of charge. You can find beautiful crochet fairy amigurumi patterns on our website. Today I am sharing pui crochet amigurumi pattern with you. A very impressive and different amigurumi pattern. You will find all the accessories in the pattern. Let’s move on to the step by step pattern instructions.
Do not hesitate to contact us if you have any questions about the mold. You don’t have to worry about the pattern, even beginners will be able to complete it thanks to the detailed amigurumi instructions. I tried to explain step by step as best I could. You can make this cute fairy amigurumi crochet pattern by following the necessary steps. Stay tuned for more free amigurumi patterns.
Little fairy pui amigurumi doll free crochet pattern
Designer: @kediperiatolyesi
Copyright Owner: Lovelycraft.com
Abbreviations
sc: single crochet
inc: increase
dec: decrease
tr: Triple/treble crochet
Dc: Double crochet
DCinc: Work 2 dc sts in the same st
hdc: Half double crochet
HDCinc: Work 2 hdc sts in the same st
sl-st: Slip stitch
ch: Chain
st/sts: stitch/stitches
FLO: Front loop only.
BLO: Back loop only.
BL: Bobble Stitch: (Yarn over insert your hook into the st and pull up a loop.Yarn over again and pull through 2 loops) repeat the steps in the same st until you have a total of 5 loops on your hook.Yarn over and pull through all 5 loops at once.
Reverse single crochet: Ch 1, working from left to right, insert your hook into the next st,turn hook to the left side, grab yarn and pull through. There are now 2 loops on your hook. Draw up a loop, bring yarn over the hook again and draw this loop through both loops.
(…)- x times: Repeat the instructions between parantheses x times.
(…): Reprensents the number of sts you should have at the end of the round.
Materials
Sport weight cotton or cotton blend yarn
8 mm safety eyes (blue)
The finished toy will be 18 cm tall if you use
Similar items.
Wire
Pliars
Fiberfill
Tapestry needle
Pins
2.5mm or a hook that fits your yarn
Scissors


LEGS (MAKE 2)
With skin color.
1. 6 sc in a magic ring (6)
2- 18. 6 sc (6)
Crochet the second leg in the same way, do not break yarn after the last round. Ch 3 and join into the first leg.
Insert wire into the legs after joining them. Measure the height of legs and cut a piece of wire a bit longer then the height of legs (we will use this wire also in the neck section) then with help of your pliars twist the ends of it.

Body
With skin color.
19. Join with 3 ch sts (18)
20-22. 18 sc
23. (2 sc, inc)- 6 times (24)
24-26. 24 sc
27. (6 sc, dec)- 3 times (21)
28. (5 sc, dec)- 3 times (18)
29-30. 18 sc
31. (4 sc, dec)- 3 times (15)
32. (3 sc, dec)- 3 times (12)
33. 12 sc
34. (dec)- 6 times (6)
35-37. 6 sc
Body is complete. Keep crocheting the head.
On Round 27 of the body join another piece of wire into the middle of the previous wire. Twist the ends of the wire around each other after finishing the neck section as in the pictures.
Do not stuff the legs, stuff the body.

HEAD
With skin color.
38. (inc)-6 times (12)
39. (1 sc, inc)- 6 times (18)
40. (2 sc, inc)- 6 times (24)
41. (3 sc, inc)- 6 times (30)
42. (4 sc, inc)- 6 times (36)
43. (5 sc, inc)- 6 times (42)
44-54. 42 sc (42)
55. (5 sc,dec)- 6 times (36)
56. (4 sc,dec)- 6 times (30)
57. (3 sc, dec)- 6 times (24)
58. (2 sc, dec)- 6 times (18)
59. (1 sc, dec)- 6 times (12)
60. (dec)- 6 times (6)
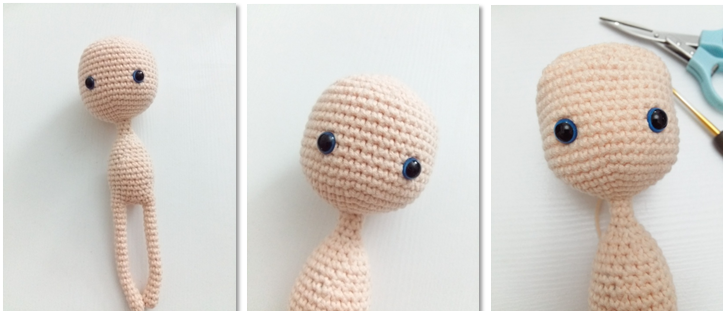
Attach safety between Round 48 and 49 of the head with 8 sts distance between them. Start stuffing the head after attaching the eyes. Add fiberfill around the wire.

Arms (Make 2)
With skin color.
1. 5 sc in a magic ring (5)
2-15. 5 sc (5)
Do not stuff the arms.
Pick up the remaining loops with your needle. Sew the arms on each side of the body.
Please look through the pictures below.

Ears (Make 2)
With skin color.
1. 4 sc in a magic ring (4)
2-3. 4 sc
4. (inc)- 4 times (8)
5. 8 sc
6. (dec)- 4 times (4)
Place the ears on each side of the head and pin them before sewing. Do not stuff the ears.
Embroider nose with skin color yarn between eyes.
Hair Cap
With blue color.
1. 6 sc in a magic ring (6)
2. (inc)- 6 times (12)
3. (inc)- 12 times (24)
Do not break yarn, keep crocheting the hair strands.
Hair Strands
1. 1 sc, ch 20, starting from the 2nd st from your hook 19 sc, sl-st into the next st
2-5. Ch 20, starting from the 2nd st from your hook 19 sc, sl-st into the next st
6. Ch 13, starting from the 2nd st from your hook 12 sc, sl-st into the next st
7. Ch 11, starting from the 2nd st from your hook 10 sc, sl-st into the next st
8-12. Ch 9, starting from the 2nd st from your hook 8 sc, sl-st into the next st
13. 1x
14. Ch 9, starting from the 2nd st from your hook 8 sc, sl-st into the next st
15. Ch 11, starting from the 2nd st from your hook 10 sc, sl-st into the next st
16. Ch 13, starting from the 2nd st from your hook 12 sc, sl-st into the next st
17-24. Ch 20, starting from the 2nd st from your hook 19 sc, sl-st into the next st
Break the yarn leaving a long tail and sew the hair cap on the head. Pin the hair cap and strands on the head before sewing to form them correctly.

Romper
Start with purple color.
1. Ch 19
Separate the sleeves.
2. Starting from the 2nd st from your hook; 3 sc, ch 3, skip 2 sts, insert your hook into the 3rd st and 8 sc, ch 3, skip 2 sts, insert your hook into the 3rd st and 3 sc.
3. Ch 1, turn, inc, 3 sc, inc, 10 sc, inc, 3 sc, inc (24)
4. Ch 2, turn, 24 dc
5. Ch 2, turn, (3 dc, DCinc)- 6 times (30dc)
6. 30 dc
Change to green color.
7. Ch 1, turn, 30 sc and join to the other side with a sl-st.
Change to purple color.
8-9. Ch 2, 30 dc
We will form the legs of the romper from now on. After finishing the first leg break the yarn, join your yarn with a sl st and repeat the same steps for the second leg.
10. Ch 2, 15 dc, sl st into the first dc.
11. Ch 1, 15 sc
Leg hem
12. (ch 3, 1 sc)- 15 sc

Flowers (Make 3)
2 of the flowers will be sewn on each side of the head, the other flower will be sewn on the shoulder.
1. Ch 14
2. Starting from the 3rd st from your hook; (DCinc)- 12 times.
Wings (Make 4)
We will make 4 wing pieces, then we will join each two pieces into one.
With pink color.
1. 7 sc, 2 dc, 3 sc in a magic ring (12)
Change to green color.
2. (HDCinc)- 4 times, 2 hdc, 1 dc, DCinc, 1 dc, 2 hdc, HDCinc (18)
Change to blue color.
3. 9 sc, HDCinc, 1 hdc, HDCinc, DCinc, ch 1, DCinc, HDCinc, 1 hdc, HDCinc, 1 sc (25)
Hold two pieces together, right side facing you. Work 1 sc in each st around, work 2 sc sts only into the ch 1 st of Round 3. There will be 26 sc sts at the end of the round.
After joining work the edge as foloows: (ch 3, sc in the nect st)- 26 times.

Necklace
With green color make a small tassel as in the pictures below to form the necklace.


After the romper is complete, there will be a small gap between legs. Sew on this gap using purple color yarn and hide the yarn tail in. In the same way close the gap at the back of the rompers until the neck section.

Embroider eyebrows and little freckles with blue color.


Download PDF File
