


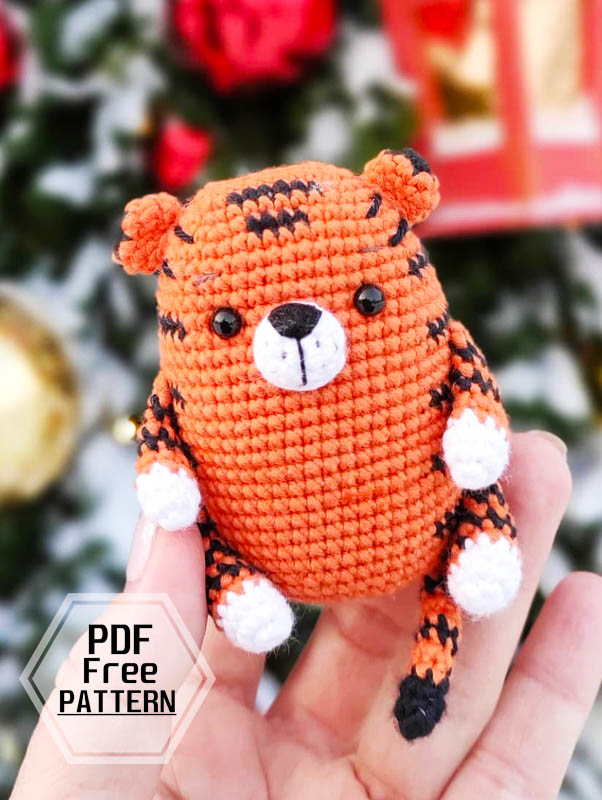
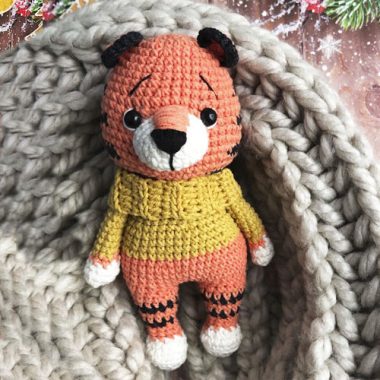
Hello dear friends. Today I’m going to share a pretty small yet gorgeous crochet tiger pattern. The tiger amigurumi, which you can use as a keychain, has a very cute design. Tiger amigurumi is formed by making and combining parts separately. It seems like an event to be made, as the Amigurumi has a rather small size. However, because there are too many color transitions, it will be a bit of a work. Now let’s crochet the tiger amigurumi step by step.
Little Tiger Crochet Amigurumi PDF Free Pattern
Designer: lucy_rose_toys
Materials and tools
1. 100% cotton DK yarn 5o g 125 n1 (for example Vita Cotton Lily) or sport yarn Yarnart Jeans. Size of the toy made with this yarn is about 8 cm.
Colours:
orange – 25 g
black – 20 g
white – 8 g
2. Crochet hook according to your yarn. (I use Clover 1,75).
3. Yarn needle, sewing needle.
4. Black thread for embroidering the nose and brown for the eyebrows (e.g. YarnArt Canarias).
5. Safety eyes or button eyes diameter 6 mm, sewing thread of black colour to sew the eyes.
6. Poliester fiberfill.
Abbreviations
MR – magic ring
ch – chain stitch
st(s) – stitch(es)
slst – slip stitch
sc – single crochet
hdc – half double crochet
inc – increase (2 sc in the same st)
dec – decrease (crochet 2 sts together)
(…) x n – repeat the instructions in the brackets n times
(n) – amount of sts in row
rnd(s) – round(s)
Work in continuos rounds unless otherwise instructed.
Change colour in the last stitch of the previous row.

Body
We will alternate two colours: orange and black. (0 and B). Start with orange.
1 rnd: 0: ch 9, start in the second chain from the hook: 1 inc, 6 sc, 3 sc in the last st, turn and continue on the other side of the chain, 7 sc (18)
Now crochet in spiral.
2 rnd: 0: 2 inc, 6 sc, 3 inc. 6 sc, 1 inc (24)
3 rnd: 0: (1 sc, 1 inc) x 2, B: 6 sc, 0:(1 sc, 1 inc) x 3, B: 6 sc, 0: 1 sc, 1 inc (30)
4 rnd: 0: (2 sc, 1 inc) x 2, 6 sc, (2 sc, 1 inc) x 3, 8 sc, 1 inc (36)
5 rnd: 0: (3 sc, 1 inc) x 2, 1 sc, B: 4 sc, 0: 1 sc, (3 sc, 1 inc) x 3, 9 sc, 1 inc (42)
6 rnd: 0: 27 sc, B: 15 sc (42)
7 rnd: 0: 42 sc
8 rnd: 0: 4 sc, 1 inc, 20 sc, 1 inc, 16 sc (44)
9 rnd: 0: 23 sc, B: 21 sc (44)
10 rnd: B: 8 sc, 0: 36 sc (44)
If you use safety eyes, insert them into the body between rounds 10 and 11.The distance between the points where you insert the eyes is 8 stitches, the distance between already fixed eyes should 6 stitches.
11 rnd: 0: 5 sc, 1 inc, 21 sc, 1 inc, 16 sc (46)
12 rnd: 0: 46 sc
13 rnd: 0: 6 sc, 1 inc, 17sc, B: 5 sc, 1 inc, 16 sc (48)
14 rnd: B: 10 sc, 0: 38 sc (48)
15 rnd: 0: 7 sc, 1 inc, 23 sc, 1 inc, 16 sc (50)
16 rnd: 0: 50 sc
17 rnd: 0: 27 sc, B: 23 SC (50)
18 rnd: B: 11 sc, 0: 39 sc (50)
19-20 rnds: 0: 50 sc (2 rnds)
21 rnd: 0: 7 sc, 1 dec, 18 sc, B: 5 sc, 1 dec, 16 sc (48)
22 rnd: B: 11 sc, 0: 37 sc (48)
23 rnd: 0: 48 sc
24 rnd: 0: 7 sc, 1 dec, 22 sc, 1 dec, 15 sc (46)
25 rnd: 0: 26 sc, B: 20 sc (46)
26 rnd: B: 5 sc, 1 dec, 3 sc, (cut the black yarn), 0: 1 dec, 3 sc, 1 dec, 8 sc, (3 sc, 1 dec) x 3,6 sc (40)
Now we crochet only with orange colour.
27-28 rnds: 40 sc (2 rnds)
29 rnd: (3 sc, 1 dec) x 8 (32)
30 rnd: (2 sc, 1 dec) x 8 (24)
31 rnd: (sc, 1 dec) x 8 (16)
Stuff the body tightly, but it must not be too round.
32 rnd: 8 dec (8)
Add some fiberfill if you need to.
Cut the yarn leaving a long tail. Close the remaining hole using a yarn needle: weave in the yarn through the front loops of all 8 stitches and pull tightly.
Hide the remaining yarn tail inside the detail.
Tail
Start with black.
1 rnd: 6 sc in MR
2-3 rnds: 6 sc (2 rnds)
Change to orange.
4-5 rnds: 6 sc (2 rnds)
Change to black: Don’t cut orange.
6 rnd: 6 sc
Change to orange.
7-8 rnds: 6 sc (2 rnds)
Change to black.
9 rnd: 6 sc
Change to orange.
10-11 rnds: 6 sc (2 rnds)
Change to black.
12 rnd: 6 sc
Change to orange.
13-14 rnds: 6 sc (2 rnds)
Change to black.
15 rnd: 6 sc
Change to orange.
16-17 rnds: 6 sc (2 rnds)
Change to black.
18 rnd: 6 sc
Change to orange.
19-20 rnds: 6 sc (2 rnds)
Change to black.
21 rnd: 6 sc
Change to orange.
22-23 rnds: 6 sc (2 rnds)
Fasten off, cut the yarn leaving a long tail for sewing.
Arms (make two)
Start with white,
1 rnd: 5 sc in MR
2 rnd: 5 inc (10)
3 rnd: 10 sc
Change to orange. Cut the white yarn.
4 rnd: (3 sc, 1 dec) x 2 (8)
5 rnd: 8 sc
Change to black. Don’t cut orange.
6 rnd: 8 sc
Change to orange.
7 rnd: 8 sc
Change to black.
8 rnd: 8 sc
Change to orange. Cut the black yarn.
9 rnd: 8 sc
Stuff only the tips of the arms.
Fold the detail and crochet 4 sc joining both sides together. Fasten off, cut the yarn leaving a long tail for sewing.
Legs (make two)
Start with white.
1 rnd: 6 sc in MR
2 rnd: 6 inc (12)
3 rnd: 12 sc
Change to orange. Cut the white yarn.
4 rnd: 12 sc
Change to black. Don’t cut orange.
5 rnd: 12 sc
Change to orange.
6 rnd: 12 sc
Change to black.
7 rnd: 12 sc
Change to orange.
8 rnd: 12 sc
Change to black.
9 rnd: 12 sc.
Change to orange. Cut the black yarn.
10 rnd: 12 SC
Stuff only the tips of the legs,
Fold the detail and crochet 6 sc joining both sides together.
Fasten off, cut the yarn leaving a long tail for sewing.
Ears (make two)
Start with black.
1 rnd: 6 sc in MR
Change to orange.
2 rnd: 6 inc (12)
3 rnd: 12 sc
4 rnd: (2 sc, 1 dec) x 3 (9)
Don’t stuff the ears.
Fasten off, cut the yarn leaving a long tail for sewing.
Muzzle
Crochet in white.
1 rnd: 6 sc in MR
2 rnd: 6 inc (12)
3 rnd: 12 sc, 1 slst
Fasten off, cut the yarn leaving a long tail for sewing.

Assembling
Sew the ears on rounds 4-7.
Sew the arms on rounds 14-16.
Sew the legs on rounds 22-25, sew well 2 upper rounds to the body.
Sew the tail in the center of the back approximately on round 25. Sew the muzzle in the center on rounds 10-14, stuff it while sewing on.
Sew on the eyes between rounds 10 and 11. The distance between the points where you sew the eyes is 8 stitches, the distance between already fixed eyes should 6 stitches. To make the process of sewing easier you may enlarge the holes where the eyes are sewn with the help of tapestry needle or reverse hook end.
Embroider black nose on the upper part of the muzzle. Embroider brown eyebrows and small spots on the muzzle. Embroider 2 black lines on each side of the head on rounds 5 and 7.
