


Welcome to my amigurumi blog! I am happy to share the lady’s cookie crochet teddy bear amigurumi pattern with you for free. You should keep reading to create this cute pattern step by step. Good luck.
Friends, as you may remember, I shared a different model of this mold before. As Mr. Cookie. In this new amigurumi pattern, I share the girl version of the cute teddy bear. It may take a little longer, but the teddy bear is pretty easy to make. You will find the crochet dress in the pattern instructions. Feel free to crochet this wonderful cute teddy bear. I recommend you try it. Nice model for beginners! I will make you love knitting amigurumi! Follow me for the continuation of these beautiful models. New animal and baby designs are coming soon.
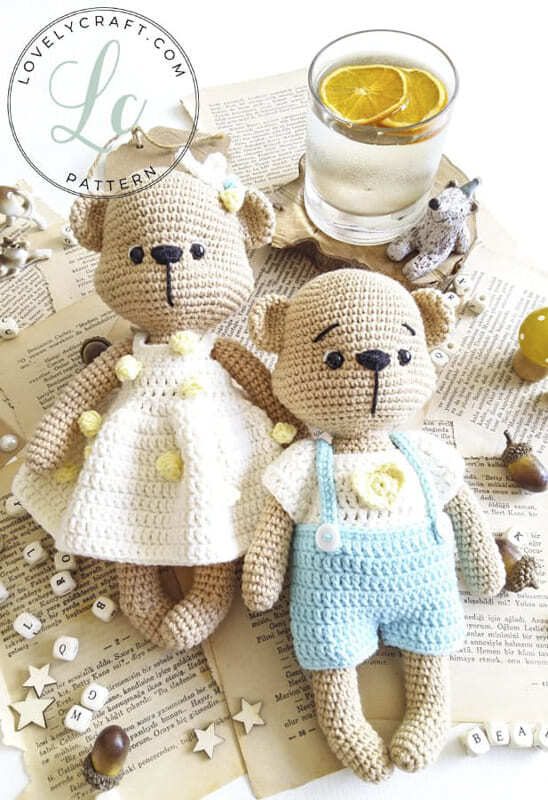
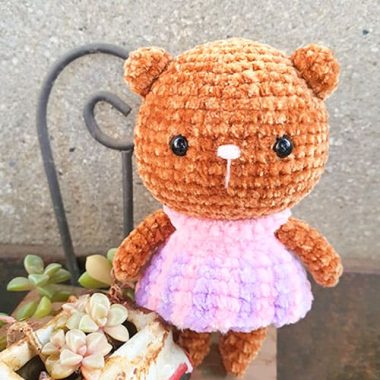
Mrs. Cookie Teddy Bear Amigurumi doll free crochet pattern
FINISHED TOY IS AROUND 30cm HEIGHT.
Designer: @kediperiatolyesi
Copyright Owner: Lovelycraft.com
ABBREVIATIONS OF BASIC TERMS
ch: Chain
sc: Single Crochet
inc: Increase
dec: Decrease
slst: Slip Stitch
hdc: Half Double Crochet
st/sts: stitch/stitches
dc: Double Crochet
tr: Triple Crochet
BLO: Back Loops Only
FLO: Front Loops Only
Bobble: Bobble Stitch
( ) : The parentheses at the end of therow give the total number of stitches of that round.
[ ]x.. : Repeatinstructions x times.
Materials
Yarnart Jeans / Milky brown (Color code 07)
Yarnart Jeans / Blue (Color code 33)
Yarnart Jeans / Cream (Color code 03)
Yarnart Jeans / Yellow (Color code 67)
1 cm White Button (2 pcs)
8mm Safety Eye (Black)
For embroidery: Black thread Felting needle
Pins
Size 2.5mm or 3mm crochet hook
Scissors


Legs (Use milky brown color and make 2)
Use a different color long yarn piece to mark beginning of round while crocheting legs.
After 11th round foot part will take its shape. Then crochet st at its sideways and front section. After that, legs will be completed by crocheting sc in next 12 st between 12-22 rounds.
When first leg is finished, fasten off and crochet second leg. After second leg finished do not fasten off yarn and join two legs with chain. Then continue crochet the body part.
Start with legs. After crocheting front foot part of leg, at 8th round heel part will be crocheted. Lastly, after 11th round is completed rest of the rounds will be crocheted and legs will be completed.
Don’t forget following instruction images and notes!
Join two legs and crochet the body as a single piece.

Rnd 1: Start 6 sc in a magic ring (6)
Rnd 2: (inc) repeat 6 times (12)
Rnd 3-7: sc in each st around (12)
Make heel part
Rnd 8: Ch 1, turn, sc in next 7st (skip 1 st and go in 3rd st) (7)
Rnd 9: Ch 1, turn, sc in next 5st (skip 1 st and go in 3rd st) (5)
Rnd 10: Ch 1, turn, sc in next 3st (skip 1 st and go in 3rd st) (3)
Join foot part and crochet leg
Rnd 11: Ch 1, turn, sc in next 3st, (sideways) sc in next 2st, (in front) sc in next 5st, (sideways) sc in next 2st (12)
Rnd 12-22: sc in each st around (12)

Body (Use milky brown color)
After crochet legs, start crocheting body part. Before joining legs make sure legs look toward inside.
While joining legs with chain, fold leg at the middle. When crochet up to waist part of body start filling polyester fiberfill.
After body is finished fasten off and leave a long tail.
Please follow instruction images!

Continue crochet the body with milky brown yarn.
Rnd 23: Ch 6 and join to legs (36)
Rnd 24: sc in each st around (36)
Rnd 25: (sc in next 5st, inc) (42)
Rnd 26: sc in each st around (42)
Rnd 27: (sc in next 13st, inc) (45)
Rnd 28: sc in each st around (45)
Rnd 29: (sc in next 14st, inc) (48)
Rnd 30-31: sc in each st around (48)

Rnd 32: (sc in next 14st, dec) (45)
Rnd 33: sc in each st around (45)
Rnd 34: (sc in next 13st, dec) (42)
Rnd 35: sc in each st around (42x)
Rnd 36: (sc in next 5st, dec) (36)
Rnd 37-38: sc in each st around (36)
Rnd 39: (sc in next 4st, dec) (30)
Rnd 40: sc in each st around (30)

Rnd 41: (sc in next 3st, dec) (24)
Rnd 42-44: sc in each st around (24)
Rnd 45: (sc in next 2st, dec) (18)
Rnd 46: sc in each st around (18)

Body is finished. Fasten off and leave a long tail.
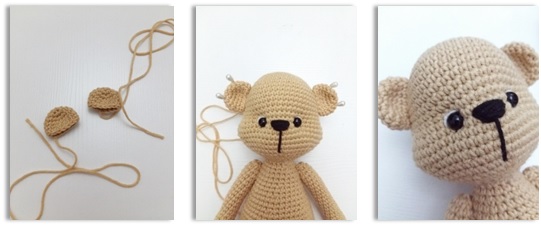
Head (Use milky brown color)
At head part, when reached the 17th round, start crocheting cheeks. There will be two protrusion at both side of head. Use a different color long yarn piece to mark beginning of round. Therefore you will increase and decrease stitches at right location.
After 23rd round, insert the safety eyes at this point. To find the center point fold the head at the center from cheek sides so safety eyes can be symmetrically inserted. After finish the head, fill the head with polyester fiberfill and continue with creating head form.
Please follow instructions images and all notes about crochet steps.
Place the safety eyes between 17 and 18 with 10 stitches gap between them.

Rnd 1: Start 6 sc in a magic ring (6)
Rnd 2: (inc) in BLO repeat 6 times (12)
Rnd 3: (sc, inc) in BLO repeat 6 times (18)
Rnd 4: (sc in next 2st, inc) (24)
Rnd 5: (sc in next 3st, inc) (30)
Rnd 6: (sc in next 4st, inc) (36)
Rnd 7: (sc in next 5st, inc) (42)
Rnd 8: (sc in next 6st, inc) (48)
Rnd 9-16: sc in each st around (48)
Rnd 17: sc in next 9st, (inc) repeat 3 times, sc in next 21st, (inc) repeat 3 times, sc in next 12st (54)
Rnd 18: sc in next 10st, inc,sc in next 3st, inc,sc in next 22st, inc, sc in next 3st, inc, sc in next 12st (58)
Rnd 19-20: sc in each st around (58)
Rnd 21: sc in next 9st, (dec) repeat 4 times, sc in next 21st, (dec) repeat 4 times, sc in next 12 st (50)
Rnd 22: sc in next 10st, dec, sc in next 23st, dec, sc in next 13st (48)
Rnd 23: sc in each st around (48)
Rnd 24: (sc in next 4st,dec) (40)
Rnd 25: (sc in next 3st, dec) (32)
Rnd 26: (sc in next 2st, dec) (24)
Rnd 27: (sc in next 1st, dec) (18)
Shape the Head
Fill the head with fiber after eye engagement and closure is complete. Get help from the visuals when filling fiber. Completed to prepare with fiber without degrading the head form.
Then we will shape your face with your milk coffee rope. Knot the end of the rope. Enter the lower part of the head with your needle and exit the lower part of the eye.
Almost through the loop to the other eye to do the same process and close the two eyes to each other to fix the rope. Do a few times while stretching with a rope between the two eyes. This way it will be more robust.
Pay attention to the point you want; It shows the very close range of the eyes. Two fingers between two fingers.
After this process is finished with white rope to the edge of the eyes of the half-circle design and black rope as in the visual nose, mouth, eyebrow process.
After the head is over, we sew two parts with the long rope we leave your body. There will be a gap between body and head while joining. Fill the form with fiber and close it with stitches.

At 21st round start filling arm with polyester fiberfill. Then finish 22nd round and join stitches to close arms. Fasten off and leave a long tail to sew arms to the body.
Place arms at shoulder section of body as narrow section of arms are looking towards the outside (Shoulder section of body is 3 rounds below from head).
Ears; Planting on both sides of the head. They will stop between 8-15 rows. Ears do not fill with fibers.
Please follow up the instruction images.
Arms (Use milky brown color yarn and make 2)

Rnd 1: Start 6 sc in a magic ring (6)
Rnd 2: (inc) repeat 6 times (12)
Rnd 3-7: sc in each st around (12)
Rnd 8: dec, sc in next 4st, dec, sc in next 4st (10)
Rnd 9-21: sc in each st around (10)
Rnd 22: (dec) repeat 5 times (5)
Ear (Use milky brown color yarn and make 2)
Rnd 1: Start 6 sc in a magic ring (6)
Rnd 2: (inc) repeat 6 times (12)
Rnd 3: (sc, inc) repeat 6 times (18)
Rnd 4: sc in each st around (18)
Rnd 5: (sc in next 4st, dec) repeat 3 times (15)
Rnd 6: sc in each st around (15)
Dress(Use cream color)
Crochet dress separately from body.
Rnd 1: ch 35
Rnd 2: Start in the second chain from the hook, sc in 34ch (34)
Preparation of sleeve separation
Rnd 3: Ch 1, turn, sc in next 5st, ch 8 (skip 7st and go into the 8th st), sc in next 10st, ch 8 (skip 7st and go into the 8th st), sc in next 5st (36)
Rnd 4-5: Ch 1, turn, sc in next 36st (36)
Rnd 6-7. Ch2, turn, dc in next 36st (36)
Crochet body section of dress.
Rnd 8: Ch 2, (dc, dc inc) repeat 18 times (54), slst
Rnd 9-10: Ch 2, (dc inc) repeat 54 times (108)

Bobble (with yellow color/ blue yarn and make 12)
A total of 11 yellow and 1 blue tiny balls will learn.
10 of them; Dress will be randomly tied on. 1 Yellow and 1 Blue; She’s gonna be standing over Mrs.Cookie.
Don’t forget to leave your rope long when starting Bobble Sticth. This will help you to throw the knot.
Ch4( the first chain stitch will be circle,the others will be counted as first dc), 1bobble stitch,slst.
Ivy (with cream color yarn and make 2)
Chain 6, SC in 2nd chain from hook, HDC in next, DC in next two, make 6 DC in last chain. Now working on the other side of the chain, DC in next two, HDC in next, SC in last (do not join yet), chain 2 and make a SC in second chain from hook, join to first SC.
Tip: Use the invisible join to create a smooth edge.

Download PDF File


Un grand merci, et je vous souhaite plein de succès.