


Hello guys,
Dear friends. First of all, a nice hello to you all!
Today’s wonderful crochet amigurumi pattern is called Noorwik girl. She’s a Viking Girl. Actually, this is a slightly different character. You will be able to find both unicorn and viking patterns together. So you will have a very wonderful and quite different baby. It goes without saying that they also have very cute elf ears.
I agree that the amigurumi pattern is a bit detailed. However, this will make your job easier. First, carefully follow the steps in the pattern. Prepare yourself a study plan. If you wish, you can do this using our application. Amigurumi has a very beautiful dress. There are some viking patterns. It symbolizes a Norwegian girl. It also has a beautiful unicorn horn. The golden yellow dress details are very impressive. She also has a very beautiful braid. She has beautiful hair in the shape of a fishtail. Now let’s start crocheting this cute crochet viking girl step by step.
Noorwik unicorn elf girl doll amigurumi free crochet pattern
Designer: @kediperiatolyesi
Copyright Owner: Lovelycraft.com
Abbreviations
sc: Single crochet
inc: Increase
dec: Decrease
tr: Treble/Triple crochet
TRinc: Work 2 tr sts intothe same st.
dc: Double crochet
hdc: Half double crochet
sl-st: Slip stitch
ch: Chain
st/sts: stitch/stitches
FLO: Front loop only.
BLO: Back loop only.
BL: Bobble Stitch: (Yarn over insert your hook into the st and pull up a loop.Yarn over again and pull through 2 loops) repeat the steps in the same st until you have a total of 5 loops on your hook.Yarn over and pull through all 5 loops at once.
Reverse single crochet: Ch 1, working from left to right, insert your hook into the next st,turn hook to the left side, grab yarn and pull through. There are now 2 loops on your hook. Draw up a loop, bring yarn over the hook again and draw this loop through both loops.
(…)- x times: Repeat the instructions between parantheses x times.
(…): Reprensents the number of sts you should have at the end of the round.
The finished toy will be approx 30 cm tall if you use similar materials.


Materials
Sport weight cotton or cotton blend yarn
Fingering weight cotton or cotton blend yarn (for horn)
Felting wool
9 mm safety eyes (brown)
Black embroidery thread
Felting needle
Fiberfill
Tapestry needle
Pins
2.00 mm and 2.5 mm or hooks that fit your yarns
Scissors
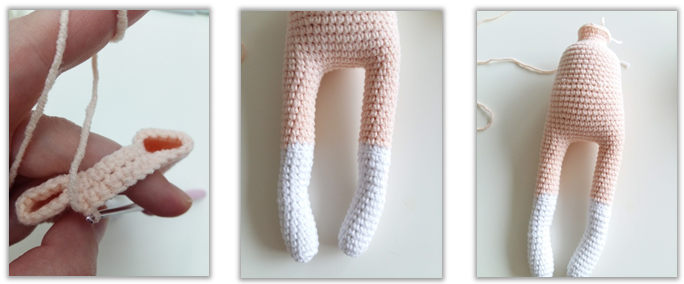
Legs (Make 2)
Start with white color.
1. 6 sc in a magic ring (6)
2. (inc)- 6 times (12)
3-11. 12 sc
12. (dec)- 2 times, 3 sc, (inc)- 2 times, 3 sc (12)
13. 12 sc (12)
14. (dec)- 2 times, 3 sc, (inc)- 2 times, 3 sc (12)
15-16. 12 sc
17. Work BLO: 12 sc
Change to skin color.
18-28. 12 sc
Break the yarn after the first leg. Crochet the second leg in the same way but do not break yarn after Round 28. Ch 8 and join two legs. Stuff the legs after joining.
To form the ruffles on the socks; join your yarn into the first st of Round 17 and (ch 1, sc 1)- 12 times. Repeat for the second sock.

Body
With skin color.
29. Join twolegs with 8 ch sts (40)
30-34. 40 sc
35. (19 sc, inc)- 2 times (42)
36-40. 42 sc
41. (5 sc, dec)- 6 times (36)
42-49. 36 sc
50. (dec)- 18 times
51-54. 18 sc
Body is complete. Start crocheting the head without breaking the yarn.
Head
55. (2 sc, inc)- 6 times (24)
56. (3 sc, inc)- 6 times (30)
57. (4 sc, inc)- 6 times (36)
58. (5 sc, inc)- 6 times (42)
59. (6 sc, inc)- 6 times (48)
60. (7 sc, inc)- 6 times (54)
61. (8 sc, inc)- 6 times (60)
62. (8 sc, dec)- 6 times (54)
63. 54x
64. 7x, dec)- 6 times 48)
65. 6x, dec)- 6 times (42)
66-74. 42 sc
75. (5 sc, dec)- 6 times (36)
76. (4 sc, dec)- 6 times (30)
77. (3 sc, dec)- 6 times (24)
78. (2 sc, dec)- 6 times (18)
79. (1 sc, dec)- 6 times (12)
80. (dec)- 6 times (6)
Attach the safety eyes between Round 66 and 67 with 8 sts distance between them.
Ears (Make 2)

With skin color.
1. 6 sc in a magic ring (6)
2-3. 6 sc
4. (1 sc, inc)- 3 times (9)
5. 9 sc
6. (2 sc, inc)- 3 times (12)
7. 12 sc
8. (dec)- 6 times (6)
Sew the ears on each side of the head after forming the hair.

Arms (Make 2)

With skin color.
1. 5 sc in a magic ring (5)
2. (inc)- 5 times (10)
3-5. 10 sc (10)
6. dec, 6 sc, dec (8)
7-23. 8 sc (8)
24. (dec)- 4 times (4)
Stuff the arms and sew them on each side of the body as in the pictures.
Horn
With fingering weight gold color yarn and 2 mm hook. Stuff the horn lightly.
1. 4 sc in a magic ring (4)
2. 4 sc
3. (1 sc, inc)- 2 times (6)
4. 6 sc
5. (2 sc, inc)- 2 times (8)
6. 8 sc
7. (3 sc, inc)- 2 times (10)
8. (4 sc, inc)- 2 times (12)
9. (5 sc, inc)- 2 times (14)
10. (6 sc, inc)- 2 times (16)
11-12. 16 sc
Hairband; Using the materials of horn; ch 10, starting from the 2nd st from your hook sc 9. Break yarn leaving a long tail and sew it on the end of braid.
Hair
I used felting wool to form the hair of Noorwik You can use another method of course.
Click for felt hair making video tutorial
Firstly form the bangs of the hair, using some felting wool and felting needle fix the wool on the head. Please take care of not to leave a gap on the head. Then form braid with another amount of felt and fix the braid on the head.
(You can sew the horn on the head before or after the hair forming.)
Hair Pictorial


Dress
Start with white color.
1. Ch 33
2. Starting from the 2nd st from your hook 32 sc
Separate the sleeves.
3. Ch 1, turn, 5 sc, ch 10, skip 5 sts, sc 12, ch 10, skip 5 sts, 5 sc
4. Ch 2, turn, 5 dc, 10 dc over the ch sts, 12 dc, 10 dc over the ch sts, 5 dc (42)
5-7. Ch 2, turn, 42 dc
8. Join each side with a sl st, ch 1 and 42 sc.
9-10. Ch 2, work BLO: 42 dc
11. Ch 3, (TRinc)- 42 times (84)
12. Ch 3, (TRinc)- 84 times (168tr)
For skirt layers;
We will be working the skirt layers into BLO sts of round 9 and 10. To start each layer join your yarn and ch 3.
1. (TRinc)- 42 times (84tr)
2. (TRinc)- 84 times (168tr)
To form the dress hem: using fingering weight yarn and 2.5 mm hook, join your yarn into the first st of each skirt layer and (sc 1, ch 2)- 168 times. Repeat for both skirt layers.
The opening which is formed after joining each side on Round 8 will be placed in the front of the doll.
Using horn materials sc around the collar and opening in the front of the dress.

Embroider eyebrows using black embroidery thread.
Download PDF File

Oh, I’m loving how you use felt for hair. Could you explain a little more, how you did the braid please? I love it! It’d be perfect for an Elsa doll.