


Hello to everyone,
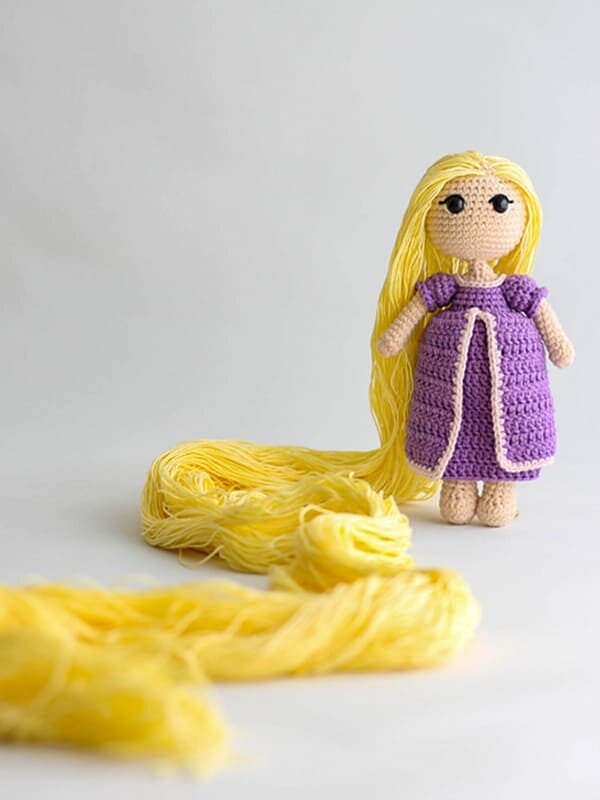
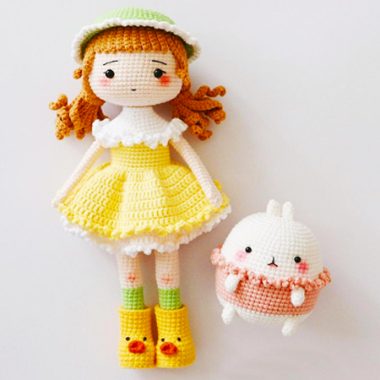
I shared the amigurumi doll pattern of Rapunzel with long hair told in fairy tales for you. You can quickly crochet the free pattern step by step. Amigurumi doll will be 15 cm in size when completed. The free amigurumi pattern is designed with long hair as told in fairy tales. After preparing your materials, let’s start making it together.
We start the Rapunzel doll amigurumi pattern by making sleeves. After the arms are completed, the legs, body and head are crocheted together. The amigurumi pattern has very long hair, as described in fairy tales. This hair is much longer than the size of the amigurumi toy. The color of the hair is yellow. You can choose yellow yarn for our fairy tale hero. She has an amigurumi pattern purple dress. You can crochet the dress and skirt part of the free pattern. You can find how to do this in the description section. I have added pictures so that you can easily make an amigurumi doll. Don’t forget to add the Amigurumi Rapunzel pattern to your favorite list.
PDF Rapunzel Doll Amigurumi Crochet Free Pattern
Designer
Instagram: anna_tee_design
Ravelry: anna_tee_design
MATERIALS AND TOOLS:
1) Yarn – YarnArt Jeans (55% cotton, 45% polyacrylic, 50 grams/160 meters), skin color, you are going to need 1/2 skein, maybe a little bit more
2) Yarn – YarnArt Jeans (55% cotton, 45% polyacrylic, 50 grams/160 meters), purple color, you are going to need less than 1/2 skein
3) Yarn – YarnArt Jeans (55% cotton, 45% polyacrylic, 50 grams/160 meters), pink color, you are going to need a little bit
4) Yarn – YarnArt Jeans (55% cotton, 45% polyacrylic, 50 grams/160 meters), black color, you are going to need a little bit
5) Yarn – YarnArt Jeans (55% cotton, 45% polyacrylic, 50 grams/160 meters), white color, you are going to need a little bit
6) Troitskaya yarn “Alina” (100% mercerized cotton, 50 gr/220 m) or other similar yarn of your choice for the hair. General recommendation for the hair is that the yarn should be thinner than your main yarn. I used “Champagne” color. I used 1 ¼ skeins.
7) Safety toy eyes 7 mm – 1 pair
8) Crochet hook 2.00 mm (I use Clover)
9) Toy filling
10) Needle
11) Stitch markers
Please note! This pattern does not contain crochet lessons, basic crochet skills are required to make the doll. The size of the finished doll is 15 cm (6 inches) if listed materials are used. Please note! If you work with yarn different than recommended, your doll may be different size.


Terms:
MR – magic ring
ch – chain
sc – single crochet
slst – slip stitch
dec – decrease (crochet 2 sc together)
inc – increase (make 2 sc in one loop)
dc – double crochet
incDC – increase double crochet (work 2 DC in 1 stitch)
BLO – back loops only
( )*3 times – repeat what’s inside brackets indicated number of times
(24) – number of stitches in the round.
Let’s start making our amigurumi doll 🙂
Let’s crochet the arms of our Amigurumi Rapunzel doll.
Arms (2 pieces)
Start with skin color yarn, crochet hook 2.00. Work in the round. Stuff slightly as you go.
1 round 10 sc in MR (10)
2 round 10 sc (10)
3 round (dec, 3 sc)*2 times (8)
4-10 round (7 rounds) 8 sc (8)
Change to purple color yarn
11 round 8 sc (8)
12 round BLO 8 inc (16)
13-14 round (2 rounds) 16 sc (16)
15 round 8 dec (8)
Cut the yarn

The sleeves of the free amigurumi pattern are completed. Now let’s crochet the legs, body and head 🙂
Legs (2 pieces)
Work with skin color yarn, crochet hook 2.00 mm. Work in the round.
1 round 6 sc in MR (6)
2 round 6 inc (12)
3 round (1 sc, inc)*6 times (18)
4 round 18 sc (18)
5 round 6 sc, 3 dec, 6 sc (15)
6 round dec, 4 sc, 2 dec, 5 sc (12)
7-8 round (2 rounds) 12 sc (12)
Stuff the foot and from here stuff as you go
9-18 round (10 rounds) 12 sc (12)
For left leg: 19 round 11 sc (one stitch short), cut the yarn
For right leg 19 round: make 16 sc (5 extra sc.) proceed to connect the legs and start working on body:

Body (stuff as you go)
Round 20: Ch 3, insert your hook in left leg into stitch after the last, 12 sc on left leg, 3 sc in chain, 12 sc on right leg, 3 sc on the other side of chain (30)
21-29 round (9 rounds) 30 sc (30)
30 round 6 sc, 2 dec, 11 sc, 2 dec, 5 sc (26)
31 round 6 sc, dec, 11 sc, dec, 5 sc (24)
Make 1 more sc to shift stitch marker to the center of the back if necessary.
Change to purple color
32 round 24 sc (24)
33-34 round (2 rounds) BLO 24 sc (24)
35 round 6 sc, dec, 9 sc, dec, 5 sc (22)
In the next round we will be attaching the arms.
35 round 3 sc, 3 sc with the arm, working through stitches of the arm and the body, 8 sc3 sc with the arm, working through stitches of the arm and the body, 4 sc (22)
36 round 4 sc, in remaining stitches of the arm: 2 sc, dec, 1 sc, 8 sc on body, in remaining stitches of the arm: 2 sc, dec, 1 sc, 4 sc on body (24)
Stuff the sleeves, Change to beige color yarn.
37 round BLO (2 sc, dec)*6 times (18)
38 round (1 sc, dec)*6 times (12)
39 round 6 dec (6)
40-41 round (2 rounds) 6 sc (6)


Head
42 round 6 inc (12)
43 round 12 inc (24)
44 round (3 sc, inc)*6 times (30)
45 round (4 sc, inc)*6 times (36)
46 round (5 sc, inc)*6 times (42)
47-51 round (5 rounds) 42 sc (42)
In the next round we’ll be making openings for the eyes
52 round 25 sc, ch 1 and skip 1 stitch, 5 sc, ch 1 and skip 1 stitch, 10 sc (42)
53-55 round (3 rounds) 42 sc (42)
Install the eyes in prepared holes
56 round (5 sc, dec)*6 times (36)
57 round (4 sc, dec)*6 times (30)
58 round (3 sc, dec)*6 times (24)
Stuff the head
59 round (2 sc, dec)*6 times (18)
60 round (1 sc, dec)*6 times (12)
61 round 6 dec (6)
Pull the hole closed, fasten off, hide yarn tail.

Let’s crochet the dress part of the Amigurumi doll 🙂
Dress
Underskirt
Work with your purple color yarn and crochet hook 2.00 mm. Work in the round, joining each round with slst, and beginning each round with starting chain unless otherwise is indicated.
Attach your purple yarn free loops of 32 round of the body (see photo)
1 round ch 2, incDC, (DC, incDC)*11 times, slst into 2nd starting chain (36)
2-12 round (11 rounds) ch 2, 35 DC, slst (36)
Fasten off, weave in ends


Top skirt
Attach purple yarn to remaining free loops of 33th round of the body, but to front if the dress (see photo). Choose central stitch that will be left unworked. Attach your yarn holding doll upside down to next stitch to the left. Work in back-and-forth rows.
1 row ch 2, incDC, (DC, incDC)*10 times, dc, turn (34)
2 row ch 2, 3 dc, incDC, (4 DC, incDC)*5 times, 4 DC, turn (40)
3-11 row (9 rows) ch 2, 39 DC, turn (40)
Fasten off, weave in ends

Attach your pink yarn to central last remaining front loop of 34 round of the body and work alongside over skirt.
Ch 1, 20 sc on right side (left if you are holding doll upside down), 3 sc in corner stitch, 38 sc on the bottom of the skirt, 3 sc in corner stitch, 21 sc on left side, slst into staring stitch. Cut the yarn, tie ends together, hide yarn tails inside the body.
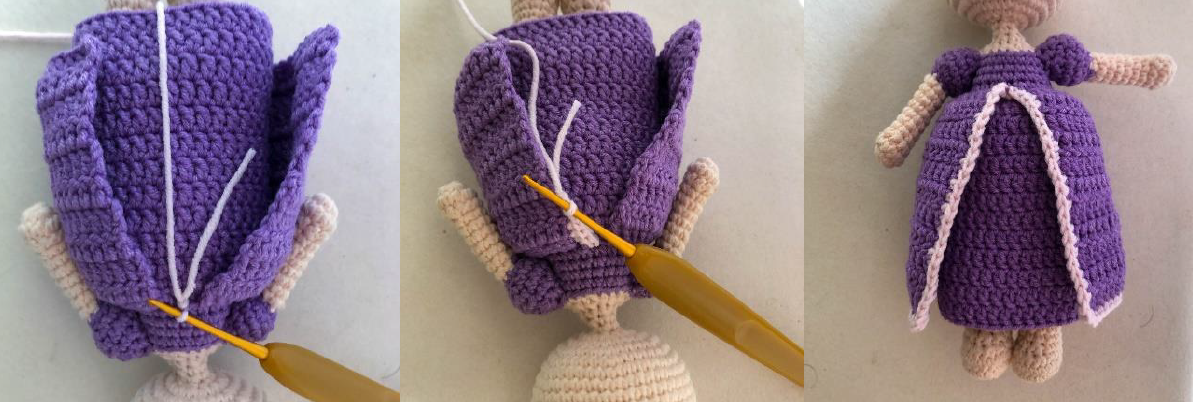
Collar
Attach your pink yarn to the back of the collar to remaining free loops of 36 round (see photo), ch 1, 24 slst, slst into starting stitch, cut the yarn, tie ends together, hide inside the body. Make sure to crochet holding the doll upside down.

Sleeves
Attach purple yarn to remaining free loops of the 12th round of the arm (under the arm). Make increases all the way, join in with slst, fasten off, hide yarn tail inside the arm.

Let’s crochet the long hair of the Amigurumi doll 🙂
Hair
Using any thread or yarn in contrasting color, make a few long stitches on the head, marking the hair line. You do not need to connect it properly, this is just to help visualize the hair line, its going away after we are done with the hair. See photo.
I recommend to use pin-markers to place guide spots first.


Cut a few pieces of the yarn that you chose for the hair, 225 cm long. This is the length of the hair for doll in the picture. It’s extremely long, if you want it shorter, adjust the length. I recommend starting from hair
line just above forehead. Here you are gong to attach the hair with every stitch. Then top of the head I recommend attaching to every other round and every 2 stitches. Back of the head needs even less hair, you can do every 2-3 rounds, up to 4-5 stitches apart. This is general recommendation, if you want her to have more hair, or if your hair yarn is much thinner, attach it closer together.
Here is how we are going to do it:
Step 1 – with your crochet hook go under 1 stitch along hair line. Fold piece of hair in half, and pull this loop through with your hook.
Step 2 – Free the hook, step 1 stitch aside, and go under 1 stitch again, but this time your hook will go through the loop of previous hair piece.
Fold 2nd piece of hair in half and pull it through the loop and under stitch.
Step 3 – pull 1st piece of hair, you will see that our very first loop disappears inside the head.
Repeat until you have completed all hair. Very last piece can be secured with the knot. This way we will have very natural looking hair that simply comes out of the head.
Pictures below illustrate the process.


Eyes (2 pcs)
Following the pictures below, embroider outlines of the eyes with black and white color yarn. Hide all tails inside the head after you are done.


You have completed the Amigurumi Rapunzel free pattern. I hope you had fun working on it! 🙂

Download PDF Pattern

