


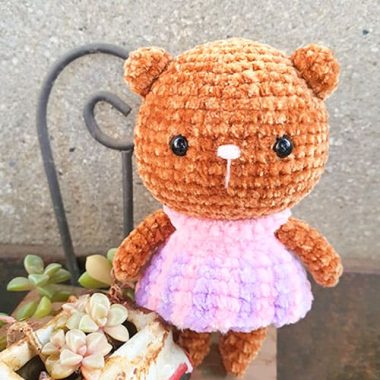
Welcome to my Amigurumi blog guys. I am happy to share the crochet teddy bear chirping amigurumi free pattern with you. You can continue reading our article to create a great step by step pattern completely free of charge.
Today is a new day and I am with you with a new free crochet amigurumi teddy bear pattern. Teddy bear amigurumi patterns are very popular and I offer this pattern absolutely free. It’s an easy model, I don’t think you’ll find it too difficult. Beginning amigurumi designers will be able to crochet easily by following them step by step. Now I leave you with the free amigurumi bear pattern.
Stay tuned to our website for more free crochet animals and dolls.
Crochet teddy bear bubsy doll free amigurumi pattern
Designer: @kediperiatolyesi
Copyright Owner: Lovelycraft.com
ABBREVIATIONS OF BASIC TERMS
ch: Chain
sc: Single Crochet
inc: Increase
dec: Decrease
slst: Slip Stitch
hdc: Half Double Crochet
dc: Double Crochet
tr: Triple Crochet
st/sts: stitch/stitches
BLO: Back Loops Only
FLO: Front Loops Only
Bobble: BobbleStitch
( ) : The parentheses at the end of therow give the total number of stitches of that round.
[ ]x.. : Repeatinstructions x times
FINISHED TOY IS AROUND 19cm HEIGHT.
Materials
Etrofil Bambino Organic / Brown (Color code 70076
Etrofil Bambino Organic / Cream (Color code 70077)
Etrofil Bambino Organic / Blue (Color code 70511)
Etrofil Bambino Organic / White (Color code 70014)
8mm Safety Eye (Black)
For embroidery: Black thread Felting needle
Pins
Size 2mm or 2.5mm crochet hook
Fiberfill
Stitch Marker


HEAD (Use brown color)
** We will form the checks between Rounds 24-26. Insert the safety eyes after Rnd 28. Specify the places of eyes between the cheeks. Insert the safety eyes between Rounds 19-20 leaving 9 sts from each other. Start stuffing the head firmly after inserting the safety eyes. The head will become narrow after the decrease rounds. Keep stuffing as you go on.
Rnd 1 start 6sc in a magic ring and join with brown sl st (6) Please look through “Techniques Section” to learn about “Magic Ring” join with a slst. Do not forget to use your stitch marker.
Rnd 2 inc in all sts (12)
Rnd 3 [sc in the next st, inc] repeat 6 times (18)
Rnd 4 [sc in the next 2 sts, inc] repeat 6 times (24)
Rnd 5 [sc in the next 3 sts, inc] repeat 6 times (30)
Rnd 6 [sc in the next 4 sts, inc] repeat 6 times (36)
Rnd 7 [sc in the next 5 sts, inc] repeat 6 times (42)
Rnd 8 [sc in the next 6 sts, inc] repeat 6 times (48)
Rnd 9 [sc in the next 7 sts, inc] repeat 6 times (54)
Rnd 10 [sc in the next 8 sts, inc] repeat 6 times (60)
Rnd 11-23 sc in all 60 sts (13 rounds)
Rnd 24 (inc) repeat 6 times, sc in the next 24 sts, (inc) repeat 6 times, sc in the next 24 sts (72)
Rnd 25 sc in all sts (72)
Rnd 26 (dec) repeat 6 times, sc in the next 24 sts, (dec) repeat 6 times, sc in the next 24 sts (60)
Rnd 27 [sc in the next 4 sts, dec] repeat 10 times (50)
Rnd 28 [sc in the next 3 sts, dec] repeat 10 times (40)
Rnd 29 [sc in the next 2 sts, dec] repeat 10 times (30)
Rnd 30 [sc in the next 3 sts, dec] repeat 6 times (24)

We knit the head part of our free amigurumi bear pattern first and then move on to the body part.
BODY (Use brown color)
Get support from the visuals when sewing the body with the head. We do the leg-play parts of the body in 12-13 rows. Those parts will appear as protrusions in the body. Align the front of the head with the front of the body after the body knitting is finished. You can do the sewing process after rehearsing with the help of marker pins. There will be space between body and head planting. When sewing fill these areas with fiber.
Rnd 1 start 6sc in a magic ring and join with brown sl st (6) Please look through “Techniques Section” to learn about “Magic Ring” join with a slst. Do not forget to use your stitch marker.
Rnd 2 inc in all sts (12)
Rnd 3 [sc in the next st, inc] repeat 6 times (18)
Rnd 4 [sc in the next 2 sts, inc] repeat 6 times (24)
Rnd 5 [sc in the next 3 sts, inc] repeat 6 times (30)
Rnd 6 [sc in the next 4 sts, inc] repeat 6 times (36)
Rnd 7 [sc in the next 5 sts, inc] repeat 6 times (42)
Rnd 8-11 sc in all 42 sts (4 rounds)
Rnd 12 (inc) repeat 6 times, sc in the next 15 sts, (inc) repeat 6 times, sc in the next 15 sts (54)
Rnd 13 [sc in the next st, inc] repeat 6 times, sc in the next 15 sts, [sc in the next st, inc] repeat 6 times, sc in the next 15 sts (66)
Rnd 14-16 sc in all 66 sts (3 rounds)
Rnd 17 [sc in the next 9 sts, dec] repeat 6 times (60)
Rnd 18 sc in all sts (60)
Rnd 19 [sc in the next 8 sts, dec] repeat 6 times (54)
Rnd 20 sc in all sts (54)
Rnd 21 [sc in the next 7 sts, dec] repeat 6 times (48)
Rnd 22 sc in all sts (48)
Rnd 23 [sc in the next 6 sts, dec] repeat 6 times (42)
Rnd 24-25 sc in all 42 sts (2 rounds)
Stuff the body
Rnd 26 [sc in the next 5 sts, dec] repeat 6 times (36)
Rnd 27-28 sc in all 36 sts (2 rounds)
Rnd 29 [sc in the next 4 sts, dec] repeat 6 times (30)
Rnd 30-31 sc in all 30 sts (2 rounds)
Rnd 32 [sc in the next 3 sts, dec] repeat 6 times (24)
Rnd 33 sc in all sts (24)

After completing the body part with crochet, we fill the body part with polyester fiber and assemble the head. Then we’ll move on to making the legs.
LEGS (with cream color/ brown yarn and make 2)
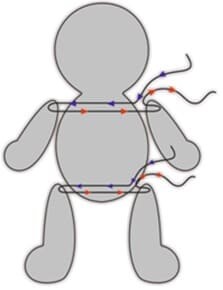
Please look through the pictures while sewing the legs to the body. Fasten off the first leg using your tapestry needle and break the yarn. Fasten off the second leg using your tapestry needle but do NOT break the yarn. Using your needle pull the yarn trough a stitch from outer side of the body to the inner side of the body (from the right bottom of the body) Pull the needle trough back the same stitch and pull it out from the opposite side of the body through the second leg to fix the legs. We will have movable legs by this way.
Please look through the schematic while sewing the pieces on the body.
Rnd 1 Start 6sc in a magic ring and join with cream slst. Use your stitch marker.
Rnd 2 inc in all sts (12)
Rnd 3 [sc in the next st, inc] repeat 6 times (18)
Rnd 4 [sc in the next 2 sts, inc] repeat 6 times (24)
Rnd 5 [sc in the next 3 sts, inc] repeat 6 times (30)
Change to brown colour
Rnd 6 [sc in the next 4 sts, inc] repeat 6 times (36)
Rnd 7 [sc in the next 5 sts, inc] repeat 6 times (42)
Rnd 8-10 sc in all 42 sts (3 rounds)
Rnd 11 sc in the next 4 sts, (dec) repeat 6 times, sc in the next 26 sts (36)
Rnd 12 sc in the next 2 sts, [sc in the next st, dec] repeat 4 times, sc in the next 22 sts (32)
Rnd 13 sc in the next 3 sts, [sc in the next st, dec] repeat 2 times, sc in the next 23 sts (30)
Rnd 14 [sc in the next 3 sts, dec] repeat 6 times (24)
Rnd 15 [sc in the next 2 sts, dec] repeat 6 times (18)
Rnd 16-23 sc in all 18 sts (8 rounds)
Stuff the leg
Rnd 24 Sc in all sts (12)
Rnd 25 (dec) repeat 6 times (6)
Body and Leg

In the same way, while filling the body part, we fill the legs with polyester fiber and fix them to the amigurumi bear character with crochet.
ARMS (with brown yarn and make 2)
Please look through the picture while sewing the arms. Fasten off the first arm with your tapestry needle and break the yarn. Fasten off the second needle with your tapestry needle but do NOT break the yarn. Pull the needle through the inner side of the arm.
Pull the needle through a stitch on the upper right side of the body. Pull the needle trough a stitch on the opposite side of the body. Pull the needle through the second arm and again pull back through the same stitches and the first arm to fix the arms. We will have movable arms by this way.
Please look through the schematic while sewing the pieces on the body.
Rnd 1 Start 6sc in a magic ring and join with brown slst. Use your stitch marker.
Rnd 2 inc in all sts (12)
Rnd 3 [sc in the next st, inc] repeat 6 times (18)
Rnd 4 [sc in the next 2 sts, inc] repeat 6 times (24)
Rnd 5 [sc in the next 11 sts, inc] repeat 2 times (26)
Rnd 6-11 sc in all 26 sts (6 rounds)
Rnd 12 sc in the next 9 sts, (dec) repeat 4 times, sc in the next 9 sts (22)
Rnd 13 sc in the next 9 sts, (dec) repeat 2 times, sc in the next 9 sts (20)
Rnd 14 sc in all 20 sts
Rnd 15 sc in the next 8 sts, (dec) repeat 2 times, sc in the next 8 sts (18)
Rnd 16-28 sc in all 18 sts (13 rounds)
Stuff the arms
Rnd 29 Sc in all sts (12)
Rnd 30 (dec) repeat 6 times (6)

After completing the arms of the Amigurumi teddy bear character step by step, we fill it with polyester fiber and fix it to the character.
EARS (with brown yarn and make 2)
Rnd 1 Start 6sc in a magic ring and join with brown slst. Use your stitch marker.
Rnd 2 inc in all sts (12)
Rnd 3 [sc in the next st, inc] repeat 6 times (18)
Rnd 4 sc in all 18 sts
Rnd 5 [sc in the next 4 sts, dec] repeat 3 times (15)
Rnd 6 sc in all 15 sts

After completing the arms, we move on to the ears of the amigurumi bear pattern and fix the ears on the head with crochet.
BOW (with blue yarn)
Please follow the pictorials and rounds! The bow consists of two pieces. After crocheting the bow fold it in half on right center and sew it.
Then fold the bow stripe and sew it on the back.
Rnd 1 Ch35
Rnd 2 Insert your hook into the 2nd stitch from your hook and sl-st, sc1, hdc1, dc2, tr7, dc2, hdc1, sc1, sl-st1, sl-st1, sc1, hdc1, dc2, tr7, dc2, hdc1, sc1, sl-st1 (34) ,ch1and turn.
Rnd 3 Sl-st1, sc1, hdc1, dc2, tr7, dc2, hdc1, sc1, sl-st1, sl-st1, sc1, hdc1, dc2, tr7, dc2, hdc1, sc1, sl-st1 (34)
Bow Stripe (with blue yarn)
Rnd 1 Ch9
Rnd 2 Insert your hook into the 2nd stitch from your hook and sc8,ch1 and turn (8)
Rnd 3 Sc around (8)

After completing an elegant crochet neck accessory of the amigurumi teddy bear, let’s move on to making a crochet beanie.
BEANIE(with blue color/ white yarn)
Please follow the pictorials and rounds!
Crochet the whole beanie as Dc.Ch2 at the beginning of each round. Start with blue color and change to white color in every round.
Crochet the pompom after completing the beanie. Stuff the pompom.Sew it at the beginning round of the beanie.
With blue colour
Rnd 1 Dc6 into the magic ring (6)
Rnd 2-4 Dc6 (6)
Change to white colour
Rnd 5 Dc2, DCinc around (8)
Rnd 6 Dc8 (8)
Rnd 7 Dc3, DCinc around (10)
Rnd 8 Dc10 (10)
Rnd 9 Dc4, DCinc around(12)
Rnd 10 Dc5, DCinc around (14)
Rnd 11 Dc6, DCinc around (16)
Rnd 12 Dc7, DCinc around (18)
Rnd 13 Dc8, DCinc around (20)
Rnd 14 Dc9,DCinc around (22)
Rnd 15 Dc10,DCinc around (24)
Rnd 16 Dc3, DCinc around (30)
Rnd 17 Dc4, DCinc around (36)
Rnd 18 Dc5, DCinc around (42)
Rnd 19 Dc42 (42)
Rnd 20 Dc6, DCinc around (48)
Rnd 20 [6dc, 1dc a]x 6 (48)
Rnd 21 Dc48 (48)
Rnd 22 Dc7, DCinc around (54)
Rnd 23-28 Dc54 (6 rounds)
After completing the crochet beanie, we do not forget to make a pom pom on it and the amigurumi teddy bear pattern is ready.
PomPom (with white color)
Rnd 1 start 6sc in a magic ring and join with brown sl st (6) Please look through “Techniques Section” to learn about “Magic Ring” join with a slst. Do not forget to use your stitch marker.
Rnd 2 inc in all sts (12)
Rnd 3-4 sc in all 12 sts (2 rounds)
Rnd 5 (dec) repeat 6 times (6)
Fasten off.

Download PDF File

