


Dear friends. Hello to everyone.
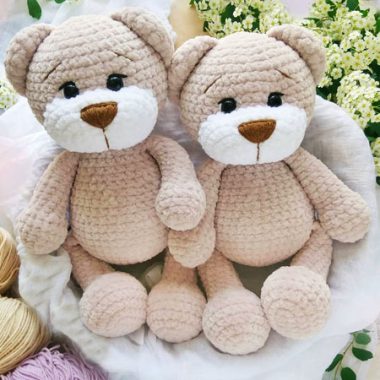
Today I will share with you a cartoon character amigurumi pattern that children love very much. Most of us know the name of this cute teddy bear. Yes, Winnie the pooh. It was a cartoon series that I watched every episode with admiration. I can still watch :). Thank you Catknit for designing this winnie the pooh teddy bear toy amigurumi pattern.
This very cute winnie the pooh amigurumi pattern is pretty easy. I think it will be a good choice for you who are new to knitting amigurumi. Amigurumi head part can be a little difficult. However, after completing this piece, your amigurumi will be very easy. I really like this teddy bear model. Okay, but why? Let me answer like this. It has colors that will warm your heart and I love the velvet rope. I also love the smile on his face. I talked a lot. Now I leave you with this cute winnie the pooh pattern.
PDF Winnie the pooh bear cartoon character amigurumi free pattern
Designer: catknit_
Materials Used
Colour A: Cygnet Yarns Chenille Chunky, Honeydew
Colour B: James C Brett Flutterby Chunky, Red
Colour C: James C Brett Flutterby Chunky, Black
Crochet hook: 4mm
Toy stuffing


ABBREVIATIONS
sc: Single crochet
inc: Increase
dec: Decrease
tr: Treble/Triple crochet dc: Double crochet
Dc: Double crochet
DCinc: Double crochet increase
sl-st: Slip stitch
ch: Chain
st/sts: stitch/stitches
FLO: Front loop only.
BLO: Back loop only.
BL: Bobble Stitch: (Yarn over insert your hook into the st and pull up a loop.Yarn over again and pull through 2 loops) repeat the steps in the same st until you have a total of 5 loops on your hook.Yarn over and pull through all 5 loops at once.
Reverse single crochet: Ch 1, working from left to right, insert your hook into the next st,turn hook to the left side, grab yarn and pull through. There are now 2 loops on your hook. Draw up a loop, bring yarn over the hook again and draw this loop through both loops.
(…)- x times: Repeat the instructions between parantheses x times.
(…): Reprensents the number of sts you should have at the end of the round.
Head
1. Using colour A, work 6sc in magic ring (6)
2. Inc in each st (12)
3. Sc in each st
4. *1sc, 1inc** repeat* to**6 times (18)
5. Sc in each st
6. *2sc, 1inc** repeat* to**6 times (24)
7. Sc in each st
8. *3sc, 1inc** repeat* to**6 times (30)
9. Sc in each st
10. *4sc, 1inc** repeat* to**6 times (36)
11. Sc in each st
12. *4sc, 1inv.dec** repeat* to**6 times (30)
13. *3sc, 1inv.dec** repeat* to**6 times (24)
14-17. Sc in each st
18. *2sc, 1inv.dec** repeat* to**6 times (18)
19. *1sc, 1inv.dec** repeat* to**6 times (12)
Stop crocheting and stuff the head firmly, make sure you pad out the cheeks.
20. Inv.dec in each st (6)
Fasten off leaving a long tail for sewing the last stitches together.
Muzzle
1. Using colour C, work 6sc in magic ring (6)
2. Inc in each st (12)
3. Sc in each st
4. *1sc, 1inc** repeat* to**6 times (18)
Attach the nose across row 9-13, stuff as you go when sewing.
Nose
Chain 5, sc 4 starting in second st from the hook.
Fasten off leaving a long tail for attaching the nose to the muzzle.
Attach just above the middle of the muzzle.
Eyes
The eyes are sewn on in round 14, with 5 sts in between.
(Optional: To add a bit more shape to the face you could make a few sts
with colour A through the inside of the head between the two sts where
you’ll be adding the eyes. Pull tightly to create an indent on each side.)
Using colour C make an upward stitch in round 14 and keep going over the same
stitch, about 4 sts should do it.
Eyebrows
The eyebrows are sewn on in diagonal line across round 15 and 16.
The lower part of the eyebrow should start in round 15, count 2 sts away
from the eye. The higher part of the eyebrow should end in line with the
eye in round 16, only one long st is needed.
Mouth
The mouth is sewn on in row 16 using a long st that curves below the muzzle.
Make a st across each sides of the smile in row 16 for the smile lines.
Ears (make 2)
1. Using colour A, work 6sc in magic ring (6)
2-3. Sc in each st
Attach the ears across round 16 (2 sts away from eyebrow) to 19.
Body
1. Using colour A, work 6sc in magic ring (6)
2. Inc in each st (12)
3. *1sc, 1inc** repeat* to**6 times (18)
4. *2sc, 1inc** repeat* to**6 times (24)
5. *3sc, 1inc** repeat* to**6 times (30)
6. *4sc, 1inc** repeat* to**6 times (36)
7. *5sc, 1inc** reepat* to**6 times (42)
8-14. Sc in each st
Change to colour B
15. *5sc,1inv.dec** repeat* to**6 times (36)
16. Sc in each st
17. *4sc, 1inv.dec** repeat* to**6 times (30)
18. Sc in each st
19. *3sc, 1inv.dec** repeat* to**6 times (24)
20. Sc in each st
21. *2sc, 1inv.dec** repeat* to**6 times (18)
22-23. Sc in each st
Stuff the body firmly and fasten off leaving a long tail for attaching
the body to the head. Sew the two parts together.
Legs (make 2)
1. Using colour A, work 6sc in magic ring (6)
2. Inc in each st (12)
3. *1sc, 1inc** repeat* to**6 times (18)
4-5. Sc in each st
6. Inv.dec 6 times, sc in the rest of the sts (12)
7-13. Sc in each st
Fasten off leaving a long tail for attaching the legs to the body.
Stuff the larger bottom part of the leg firmly and the upper part lightly.
Close the leg with a flat seam across the top (this seam will sit flush with the
body) before you sew in place across row 16 and 17 of the body.
Arms (make 2)
1. Using colour A, work 6sc in magic ring (6)
2. Inc in each st (12)
3-7. Sc in each st
Change to colour B
8-13. Sc in each st
Fasten off leaving a long tail for attaching the arms to the body.
Stuff the arms lightly (you don’t want them sticking out too much).
Close the arms with a flat seam across the top.
Attach the arms in row 22 and make a few sts under the arms in a couple of
rows further down so the arms doesn’t stick out.

Download PDF Pattern


Hi I love your Pooh ! How do you attach the head ( 6sc) to the body with 18sc?? Please help me with that
hello, I am wondering if by chance you may have United States of America written pattern for this. I am seriously confused with the instructions. Can you please help. Sorry for the bother.
Shouldn’t the muzzle be honeydew color?