


Dear friends, first of all, hello to everyone.
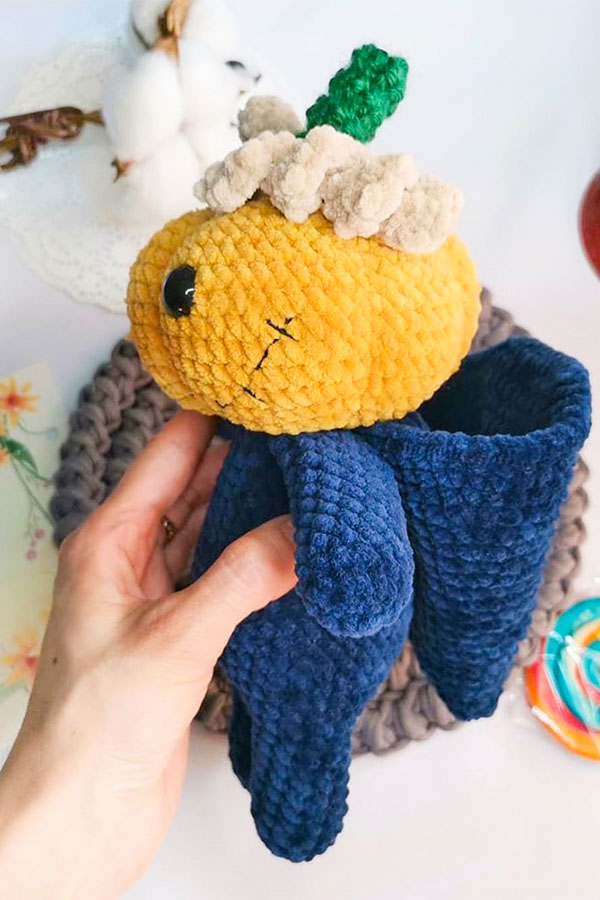
Today I prepared a wonderful Halloween pumpkin zombie amigurumi pattern for you. A big thank you to konyshevatoys for this pattern. The purpose of Amigurumi is Halloween. This kind of beautiful dolls are very loved every Halloween. This cute crochet amigurumi pumpkin zombie is one of them.
This cute crochet zombie pumpkin amigurumi is made using velvet yarn. It has very vibrant colors. My personal opinion is the only thing missing is the mouth. The mouth part can be made a little more detailed. You can design it by adding your own comments. Apart from that, I really liked the crochet hoodie detail. The disproportionate size of a separate eye reflects the distinctiveness of the amigurumi character. Now let’s move on to the step by step pattern instructions and start crocheting this cute pumpkin. Stay tuned for more free amigurumi patterns.
PDF Hallowen Mr. Pumpkin Zombie Amigurumi Crochet Free Pattern
Designer: konyshevatoys


Materials
1. Plush yarn (100g/120m):
You are welcome to use any colior that you like
-No. 80330 (80312,80316- any shade of orange) for the head- 1/2 of skein
-No. 80321 for the body and hood- 1/2 of skein
2. Hook size 3.5mm (or suitable size for you), 4.5mm for the hood
3. Safety eyes (I have size 10 and 12mm)
4. polyester toy filling
5. Yarn vita coco (or analogue) for decoration
6. Yarn vita coco for the mouth
7. Needle with wide eye and needle for sewing pieces
8. Scissors
9. Crochet markers
When using these materials, the size of the finished toy is- 22cm. Work in a spiral.
Please note that the size of your toy depends on your crocheting density and the size
of your hook. Legs and body are crocheted as one piece. Arms are crocheted into the body.
Abbreviations
MR– magic ring
ch– chain stitch
sc– single crochet
sl st– slip stitch
inc– increase
dec– decrease
hdc– hald double crochet
(sc,inc)*N– repeat instruction in brackets N times
Arms (2 details)
1. 6sc in MR (6)
2. 6inc (12)
3-12. 12sc (12)
Stuff the arm slightly. Fold the arm in half and crochet 6sc throught both
sides. Cut the yarn, fasten off and weave in te yarn ends.
We will crochet the arms into the body.

Legs (2 details)
1. 6sc in MR (6)
2. 6inc (12)
3-10. 12sc (12)
Do not cut the yarn on the second leg. Crochet 3ch and join the legs and continue
crocheting the body.

Body
Stuff in the process.
11. 12sc on the right leg. 3inc on the chain, 12sc on the left leg.
3inc on the chain (36)
12. (5sc,inc)*6 (42)
13-18. 42sc (42)
19. (5sc,dec)*6 (36)
20-21. 36sc (36)
22. (4sc,dec)*6 (30)
23-24. 30sc (30)
25. (3sc,dec)*6 (24)
26-27. 24sc (24)
28. (2sc,dec)*6 (18)
Join the arms, make sure, that the armsare symmetrical to the body.
29. 2sc, 6sc with the right arm, 3sc, 6sc with the left arm, 1sc (18)
30. 18sc (18)
Cut the yarn, fasten off and weave in the yarn ends.

Head
1. 6sc in MR (6)
2. 6inc (12)
3. (sc,inc)*6 (18)
4. (2sc,inc)*6 (24)
5. (3sc,inc)*6 (30)
6. (4sc,inc)*6 (36)
7. (5sc,inc)*6 (42)
8. (6sc,inc)*6 (48)
9. (7sc,inc)*6 (54)
10. (8sc,inc)*6 (60)
11-15. 60sc (5 rounds)
16. (8sc,dec)*6 (54)
Insert safety eye between rounds 14-15.
17. (7sc,dec)*6 (48)
18. (6sc,dec)*6 (42)
19. (5sc,dec)*6 (36)
20. (4sc,dec)*6 (30)
21. (3sc,dec)*6 (24)
22. (2sc,dec)*6 (18)
23. (sc,dec)*6 (12)
24. 6 dec
Cut the yarn, fasten off and weave in the yarn ends.

Head Decoration
Divide the head into sections. The guideline for it is increases and decreases.
Stretch the thread from the bottom of the head and exit it thgrought the top, make
the first slice. Insert it back from the bottom of the the head and pull tight, make
a knot. repeat this to the end.

Eye
1. 6sc in MR (6)
2. 6inc (12)
3. (sc,inc)*6 (18)
4. 18sc (18)
Fasten off, cut the yarn and weave in the yarn ends.
Insert safety eye into the white of the eye and sew it on.

Face Decoration
Outline a mouth with pins. Insert the needle from the bottom of the head and exit
it throught the corner of the mouth. Pull the thread over the pins and fix the
position of the thread with stitches.

Stem
1. 6sc in MR (6)
2-5. 6sc (4 rounds)
6. 3 sl st, 3 hdc (6)
7. 6inc (12)
8. 12inc (24)
Fasten off, cut the yarn and weave in the yarn ends.
Tendril
Start with 20 ch, from the second chain on the hook: inc in each ch.
Crochet as many tendrils as you want. Cut the yarn and fasten off.
Hood
1. 6sc in MR (6)
2. 6inc (12)
3. 12sc (12)
4. (sc,inc)*6 (18)
5. 18sc (18)
6. (2sc,inc)*6 (24)
7. 24sc (24)
8. (3sc,inc)*6 (30)
9. 30sc (30)
10. (4sc,inc)*6 (36)
11. 36sc (30)
12. (5sc,inc)*6 (42)
13. 42sc (48)
14. (6sc,inc)*6 (48)
15. 48sc (48)
16. (7sc,inc)*6 (54)
17. 54sc (54)
18. (8sc,inc)*6 (60)
19. 60sc (60)
If the hood seems to small, you can crochet one more round with increases.
Assembly
Sew the stem and tendrils to the head. Then sew the head to the body.
Sew the hood on.

Download PDF Pattern

