


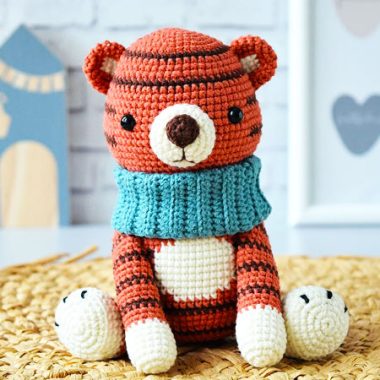
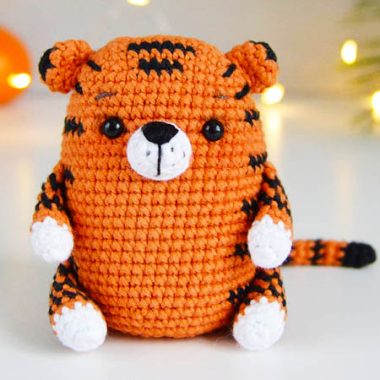
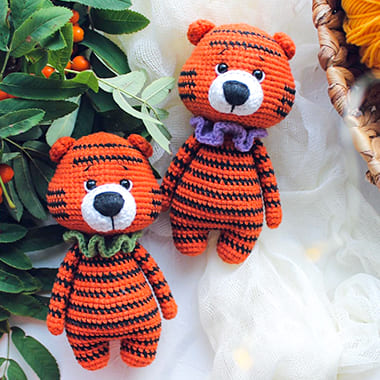
Hi all friends, I wish you all a happy weekend, today’s awesome amigurumi pattern plush crochet tiger couple will be a great companion for your boys and girls For other amigurumi animal patterns, you can visit our website and check out more different patterns.
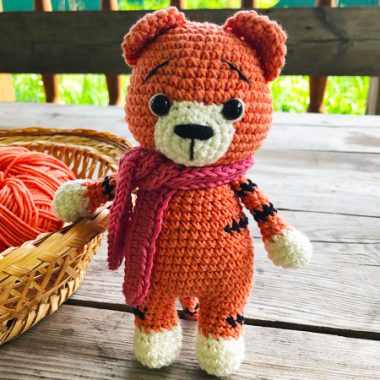
Plush tiger amigurumi pattern, two at once. After completing the tiger patterns, you can create a double tiger in this way by making a dress and a strappy trousers. You can use any color you want in the dress and trousers pattern, we leave the choice to you. Thanks to the owner of the pattern.
Plush Tiger Amigurumi Free Crochet Pattern
Designer
Instagram: duck_ville
Materials
1. Yarn YarnArt jeans in orange, black, white
colors for tiger, green for dress and blue for pants
(for clothes you can use any colors you like)
2. Safety eyes 8mm
3. 2mm crochet hook
4. Fiberfill for stuffing
5. Yarn needle
6. Scissors
7. (Optional) Pipe cleaner
Abbreviations
MR– magic ring
Ch– chain
Sc– single crochet
Inc– increase
Dec– invisible decrease
Slst– slip stitch
Dc– double crochet
Size: 20cm tall when made with the indicated yarn.
Arm (make 2)
Start in orange yarn
Rnd 1: 7sc in MR (7)
Rnd 2-4: 7sc (7)
Black Rnd 5: 7sc (7)
Orange Rnd 6-7: 7sc (7)
Black Rnd 8: 7sc (7)
Orange Rnd 9-10: 7sc (7)
Black Rnd 11: 7sc (7)
Orange Rnd 12-13: 7sc (7)
Black Rnd 14: 7sc (7)
Orange Rnd 15-16: 7sc (7)
Black Rnd 17: 7sc (7)
Orange Rnd 18-19: 7sc (7)
Black Rnd 20: 7sc (7)
Orange Rnd 21-22: 7sc (7)
Black Rnd 23: 7sc (7)
Orange Rnd 24-25: 7sc (7)
Fasten off, leaving a long tail for sewing. The arms don’t need to be stuffed (or insert pipe cleaner into the arms).

Tail (make 1)
Start in orange yarn
Rnd 1: 6sc in MR (6)
Rnd 2: 6sc (6)
Black Rnd 3: 6sc (6)
Orange Rnd 4-5: 6sc (6)
Black Rnd 6: 6sc (6)
Orange Rnd 7-8: 6sc (6)
Black Rnd 9: 6sc (6)
Orange Rnd 10-11: 6sc (6)
Black Rnd 12: 6sc (6)
Orange Rnd 13-14: 6sc (6)
Black Rnd 15: 6sc (6)
Orange Rnd 16-17: 6sc (6)
Black Rnd 18: 6sc (6)
Orange Rnd 19: 6sc (6)
Fasten off, leaving a long tail for sewing. The tail don’t need to be stuffed.

Legs (make 2)
Start in orange yarn
Rnd 1: 10sc in MR (10)
Rnd 2-4: 10sc (10)
Black Rnd 5: 10sc (10)
Orange Rnd 6-7: 10sc (10)
Stuff the leg with fiberfill and continue stuffing as you go.
Black Rnd 8: 10sc (10)
Orange Rnd 9-10: 10sc (10)
Black Rnd 11: 10sc (10)
Orange Rnd 12-13: 10sc (10)
Black Rnd 14: 10sc (10)
Orange Rnd 15-16: 10sc (10)
Black Rnd 17: 10sc (10)
Orange Rnd 18-19: 10sc (10)
Black Rnd 20: 10sc (10)
Orange Rnd 21: 10sc (10)
Fasten off and weave in the yarn end of the first leg. Do not fasten off second leg. We will continue on from the second leg to form the body.

Body
Rnd 1: ch8, 10sc on the first leg, sc in next 8ch, 10sc on the second leg, sc in next 8ch (36)
Black Rnd 2: 36sc (36)
Orange Rnd 3-4: 36sc (36)
Black Rnd 5: 36sc (36)
Orange Rnd 6-7: 36sc (36)
Black Rnd 8: 36sc (36)
Orange Rnd 9-10: 36sc (36)
Black Rnd 11: 36sc (36)
Orange Rnd 12-13: 36sc (36)
Black Rnd 14: (4sc,dec)*6 (30)
Orange Rnd 15: 30sc (30)
Rnd 16: (4sc,dec)*5 (25)
Black Rnd 17: 25sc (25)
Orange Rnd 18: (3sc,dec)*5 (20)
Rnd 19: 20sc (20)
Black Rnd 20: 20sc (20)
Orange Rnd 21: 20sc (20)
Fastan off, leaving a long tail for sewing.
Sew the tail to the back of the body between round 2 and 4.
Sew the arms on either side of the body between rounds 19 and 21.

Head
Orange yarn
Rnd 1: 6sc in MR (6)
Rnd 2: 6-inc (12)
Rnd 3: (1sc,inc)*6 (18)
Rnd 4: (2sc,inc)*6 (24)
Rnd 5: (3sc,inc)*6 (30)
Rnd 6: (4sc,inc)*6 (36)
Rnd 7: (5sc,inc)*6 (42)
Rnd 8-15: 42sc (42)
Rnd 16: (5sc,dec)*6 (36)
Rnd 17: (4sc,dec)*6 (30)
Rnd 18: (3sc,dec)*6 (24)
Rnd 19: (5sc,dec)*4 (20)
Rnd 20-21: 20sc (20)
Fasten off.

Muzzle
White yarn
Rnd 1: 6sc in MR (6)
Rnd 2: 6-inc (12)
Rnd 3: (1sc,inc)*6 (18)
Rnd 4: (2sc,inc)*6 (24)
Rnd 5-6: 24sc (24)
Fasten off, leaving a long tail for sewing.

Ears (make 2)
Orange yarn
Rnd 1: 6sc in MR (6)
Rnd 2: 6-inc (12)
Rnd 3: (1sc,inc)*6 (18)
Rnd 4: 18sc (18)
Rnd 5: (3sc,dec)*3,3sc (15)
Fasten off, leaving a long tail for sewing.

Assembly
Insert the safety eyes between rounds 10 and 11, with an interspace of 12 stitches. For girl; when you have defined the holes to place safety eyes, sew the eyelashes then add safety eyes. Stuff the head with fiberfill. Stuff the muzzle with fiberfill, sew to the head between rounds 10 and 19 between eyes. The ears don’t need to be stuffed. Flatten the ears and sew between rounds 4 and 10 on either side of the head. Embroider a small nose on the white muzzle.
Embroider tiger stripes on the head as you like.Sew the head to the body.

Dress
Ch 26. Start crochet in rows.
Row 1: Start in second ch from hook, 25sc, 2ch, turn
Row 2: 25-inc dc (50), 2ch, turn
Row 3: 50dc, 1ch, turn
Row 4: 7sc, 2ch, skip 11st, 14sc, 2ch, skip 11 st, 7sc (32), 2ch, turn
Row 5: 32dc, 2ch, turn
Row 6: (1dc,inc dc)*16 (48), 2ch, turn
Row 7: (2dc,inc dc)*16 (64), slst in first stitch, 2ch
Continue working in a circle.
Row 8: (7dc,inc dc)*8 (72), slst, 2ch
Row 9: (11dc, inc dc)*6 (78), slst, 2ch
Row 10: 78 dc (78), slst,2ch
Row 11: (12dc, inc dc)*6 (84), slst, 2ch
Row 13: 84dc (84), slst, 2ch4
Row 14: 84 revers sc (84)
Fasten off.
Sew buttons to rows 4 and 6. Use the holes between two outer double crochets as buttonholes.

Trousers
Start crochet trouser legs.
Ch 16. make sure your chain isn’t twisted. Insert the hook in the first chain stitch and join the foundation chain with slst. Continue working in a spiral.
Rnd 1-12: 16sc (16)
Fasten off on the first trouser leg. Don’t fasten off on the second trouser leg. We will continue on from the second trouser leg.
Rnd 13: 6ch, 16sc on the first trouser leg, sc in next 6ch, 16sc on the second
trouser leg, sc in next 6ch (44)
Rnd 14-16: 44sc (44)
Rnd 17: 36sc, 4ch, skip 4st, 1sc (44)
Rnd 18-22: 44sc (44)
Fasten off.
Next crochet the front pad. In front of the trousers find the middle of the trousers, count 5st from it and attach the thread. Crochet in rows.
Row 1-8: 10sc, 1ch, turn.
Fasten off.

Make straps. Attach the thread to the back of the trousers over the right edge of the tail hole. Crochet 26 ch, start in the 7 th loop from hook (this will be the buttonhole) sc in next 20 ch. Fasten off. Repeat the same above the left edge of the tail hole. Sew on the buttons at the corners of the front pad.
